
Flutter 屏幕锁定
这个 Flutter 插件提供了一个屏幕锁定功能。输入您的密码即可解锁屏幕。您也可以选择使用生物识别身份验证。
⚠注意
详细的 API 描述稍后提供。
仅提供暂时必要的信息。
功能
- 通过字符长度
- 您可以更改“取消”和“删除”小部件
- 优化设备尺寸和方向的 UI
- 您可以禁用取消
- 您可以使用生物识别(local_auth 插件)
- 首次启动时可以显示生物识别
- 解锁回调
- 您可以指定不匹配事件。
- 限制最大重试次数
用法
您可以使用以下代码轻松锁定屏幕。
要解锁,请输入 correctString。
简单
如果输入的与 correctString 相同,屏幕将自动关闭。
import 'package:flutter_screen_lock/functions.dart';

screenLock(
  context: context,
  correctString: '1234',
);
更改数字
提供一个无法取消的屏幕锁定。
import 'package:flutter_screen_lock/functions.dart';

screenLock(
  context: context,
  correctString: '1234',
  canCancel: false,
);
确认屏幕
您可以显示确认屏幕,并在两次输入匹配时使用 didConfirmed 获取第一次输入。
import 'package:flutter_screen_lock/functions.dart';

screenLock(
  context: context,
  correctString: '',
  confirmation: true,
  didConfirmed: (matchedText) {
    print(matchedText);
  },
);
控制确认状态
import 'package:flutter_screen_lock/functions.dart';
import 'package:flutter_screen_lock/input_controller.dart';

final inputController = InputController();

screenLock(
  context: context,
  correctString: '',
  confirmation: true,
  inputController: inputController,
);

// Release the confirmation state at any event.
inputController.unsetConfirmed();
使用 local_auth
将 local_auth 包添加到 pubspec.yml。
https://pub.dev/packages/local_auth
它包含一个示例,该示例在 `didOpened` 中显示屏幕锁定并立即调用生物识别。
import 'package:flutter_screen_lock/functions.dart';
import 'package:local_auth/local_auth.dart';
import 'package:flutter/material.dart';

/// Method extraction to call by initial display and custom buttons.
Future<void> localAuth(BuildContext context) async {
  final localAuth = LocalAuthentication();
  final didAuthenticate = await localAuth.authenticateWithBiometrics(
      localizedReason: 'Please authenticate');
  if (didAuthenticate) {
    Navigator.pop(context);
  }
}

screenLock(
  context: context,
  correctString: '1234',
  customizedButtonChild: Icon(
    Icons.fingerprint,
  ),
  customizedButtonTap: () async {
    await localAuth(context);
  },
  didOpened: () async {
    await localAuth(context);
  },
);
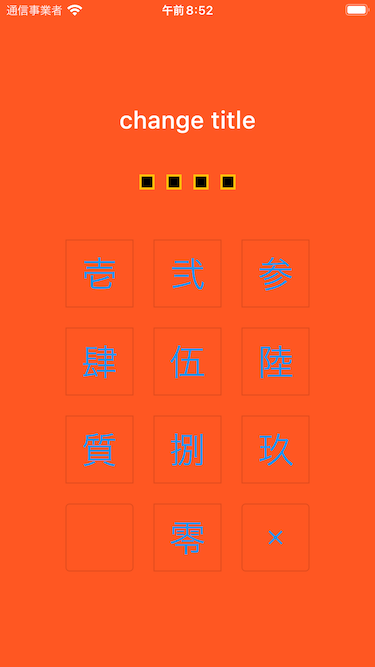
完全自定义
import 'package:flutter/material.dart';
import 'package:flutter_screen_lock/configurations/input_button_config.dart';
import 'package:flutter_screen_lock/configurations/screen_lock_config.dart';
import 'package:flutter_screen_lock/configurations/secret_config.dart';
import 'package:flutter_screen_lock/configurations/secrets_config.dart';
import 'package:flutter_screen_lock/functions.dart';
import 'package:flutter_screen_lock/screen_lock.dart';

screenLock(
  context: context,
  title: Text('change title'),
  confirmTitle: Text('change confirm title'),
  correctString: '1234',
  confirmation: true,
  screenLockConfig: ScreenLockConfig(
    backgroundColor: Colors.deepOrange,
  ),
  secretsConfig: SecretsConfig(
    spacing: 15, // or spacingRatio
    padding: const EdgeInsets.all(40),
    secretConfig: SecretConfig(
      borderColor: Colors.amber,
      borderSize: 2.0,
      disabledColor: Colors.black,
      enabledColor: Colors.amber,
      height: 15,
      width: 15,
      build: (context, {config, enabled}) {
        return SizedBox(
          child: Container(
            decoration: BoxDecoration(
              shape: BoxShape.rectangle,
              color: enabled
                  ? config.enabledColor
                  : config.disabledColor,
              border: Border.all(
                width: config.borderSize,
                color: config.borderColor,
              ),
            ),
            padding: EdgeInsets.all(10),
            width: config.width,
            height: config.height,
          ),
          width: config.width,
          height: config.height,
        );
      },
    ),
  ),
  inputButtonConfig: InputButtonConfig(
    textStyle:
        InputButtonConfig.getDefaultTextStyle(context).copyWith(
      color: Colors.orange,
      fontWeight: FontWeight.bold,
    ),
    buttonStyle: OutlinedButton.styleFrom(
      shape: RoundedRectangleBorder(),
      backgroundColor: Colors.deepOrange,
    ),
  ),
  cancelButton: const Icon(Icons.close),
  deleteButton: const Icon(Icons.delete),
);
API 参考
screenLock / ScreenLock API
| 属性 | 类型 | 默认值 | 描述 |
|---|---|---|---|
| context | BuildContext | (必需) 仅 [screenLock] | |
| correctString | 字符串 | (必需) 输入正确的字符串 如果 [confirmation] 为 `true`,则此项将被忽略,请将其设置为任何字符串或空字符串。 |
|
| screenLockConfig | ScreenLockConfig | ScreenLockConfig() | 请参阅 ScreenLockConfig 的 API |
| secretsConfig | SecretsConfig | SecretsConfig() | 请参阅 SecretsConfig 的 API |
| inputButtonConfig | InputButtonConfig | InputButtonConfig() | 请参阅 InputButtonConfig 的 API |
| canCancel | 布尔值 | 真 | `true` 显示取消按钮。(默认: `true`) |
| confirmation | 布尔值 | 确保第一次和第二次输入相同。 | |
| digits | 整数 | 当 [confirmation] 为 `true` 时,设置输入字符的最大数量。 | |
| maxRetries | 整数 | 0 | `0` 表示不限制。 例如,如果设置为 1,则第一次失败时会调用 didMaxRetries。 |
| didUnlocked | void Function() | 如果值与 correctString 匹配,则调用。 | |
| didError | void Function(int retries) | 如果值与 correctString 不匹配,则调用。 | |
| didMaxRetries | void Function(int retries) | 达到最大尝试次数时触发的事件。 | |
| didOpened | void Function() | 例如,当您想执行生物识别身份验证时。仅 [screenLock] | |
| didConfirmed | void Function(String matchedText) | 在确认期间,第一次和第二次输入匹配时调用。 可以作为参数接收匹配的文本。 |
|
| customizedButtonTap | Future<void> Function() | 点击左下角按钮。 | |
| customizedButtonChild | Widget | 左下角按钮的子部件。 | |
| footer | Widget | 在页脚添加一个 Widget。 | |
| cancelButton | Widget | 更改取消按钮的子部件。 | |
| deleteButton | Widget | 更改删除按钮的子部件。 | |
| title | Widget | HeadingTitle(text: '请输入密码。') | 更改标题小部件。 |
| confirmTitle | Widget | HeadingTitle(text: '请输入确认密码。') | 更改确认标题小部件。 |
| inputController | InputController | 从外部控制确认状态的更改。 |
ScreenLockConfig API
| 属性 | 类型 | 默认值 | 描述 |
|---|---|---|---|
| backgroundColor | 颜色 | 指定屏幕的背景颜色。默认情况下,将设置 themeData。 | |
| themeData | ThemeData | ScreenLockConfig.defaultThemeData |
SecretsConfig API
| 属性 | 类型 | 默认值 | 描述 |
|---|---|---|---|
| spacing | 双精度 | 秘密小部件之间的绝对间距。 如果同时指定了 spacingRatio,则此项具有优先权。 |
|
| spacingRatio | 双精度 | 0.05 | 秘密小部件之间的间距比例。 |
| padding | EdgeInsetsGeometry | EdgeInsets.only(top: 20, bottom: 50) | Secrets Widget 的内边距。 |
| secretConfig | SecretConfig | SecretConfig() | 请参阅 SecretConfig 的 API |
SecretConfig API
| 属性 | 类型 | 默认值 | 描述 |
|---|---|---|---|
| width | 双精度 | 16 | 小部件宽度。 |
| 高度 | 双精度 | 16 | 小部件高度。 |
| borderSize | 双精度 | 1.0 | 边框尺寸。 |
| borderColor | 颜色 | Color(0xFFFFFFFF) | 边框颜色。 |
| enabledColor | 颜色 | Color(0xFFFFFFFF) | 输入激活时的填充颜色。 |
| disabledColor | 颜色 | Color(0xFFFFFFFF) | 未输入时的填充颜色。 |
InputButtonConfig API
| 属性 | 类型 | 默认值 | 描述 |
|---|---|---|---|
| 高度 | 双精度 | MediaQuery.of(context).size.height * 0.6 * 0.16 |
按钮高度。 |
| width | 双精度 | MediaQuery.of(context).size.width * 0.22 |
按钮宽度。 |
| autoSize | 布尔值 | 真 | 自动调整方形尺寸以适应设备的纵横比。 |
| inputStrings | List<String> | ['0','1','2','3','4','5','6','7','8','9'] | 要与 correctString 匹配的字符串。 |
| displayStrings | List<String> | ['0','1','2','3','4','5','6','7','8','9'] | 要在屏幕上显示的字符串。 |
| style | ButtonStyle | 建议使用 [OutlinedButton.styleFrom()] 来修改它。 | |
| 文本样式 | TextStyle | 更改按钮的文本样式。 |
我使用的应用
TimeKey


