
Flutter 是一个强大而直观的框架,用于使用 Dart 编程语言构建精美的跨平台移动应用程序。
这基本上意味着 Flutter 可以用于编写一个应用程序的单一代码库,该应用程序可以在 iOS 和 Android 上原生运行。
随着 Flutter 和移动应用开发的热度不断,学习 Flutter 是一项非常有价值的技能,本身也是一项令人欣慰的事业。然而,由于该语言相对较新,学习 Flutter 的路径有些不清晰。
- 该语言不断更新(以至于几个月前的教程就已经过时)
- 与 Python 等一些更成熟的框架和语言相比,免费、经过深思熟虑且全面的课程或书籍较少
本指南汇集了教程、技巧、示例(附带截图)、资源,甚至一个示例项目,以帮助您更轻松地学习 Flutter。您可以是完全的初学者、中级开发者,甚至是高级程序员来使用本指南。希望您觉得它有用!
注意:本指南中的所有代码都在此存储库的“code”文件夹中。
入门
在我们开始学习 Dart 和 Flutter 之前,我们需要先设置我们的编程环境,我们将使用它来编写 Flutter 应用程序。
为 Dart 和 Flutter 提供最多功能的两个主要 IDE 是 Visual Studio Code (VS Code) 和 Android Studio。选择哪一个取决于您,但我稍微偏爱 VS Code,因为它看起来很酷……
如果您有 coc 或 native lsp 并安装了 Dart 和 Flutter 扩展,也可以使用 Vim。
选择正确的 IDE 对于充分利用 Dart 编程语言提供的所有功能至关重要。拥有 IDE/文本编辑器后,请确保安装 Dart 扩展和 Flutter 扩展。有了这些扩展,我们的 IDE/文本编辑器将执行非常详细的错误检查、类型检查、空安全检查和格式化,使我们作为开发者的生活更加轻松。
环境设置好后,我们继续!
学习 Dart
Dart 是由 Google 开发的语言,是 Flutter 框架的支柱。它是您在 Flutter 框架中编写应用程序时将使用的语言。
如果您从未编写过代码,或者编程经验较少,我建议您观看 Mike Dane 在 YouTube 上的这个精彩教程(请不要一次性看完!花些时间在休息或做其他事情时在潜意识中思考编程概念)。
话不多说,这是 Dart 的基础知识。
目录
变量
Dart 中的变量是类型检查的,这意味着每个变量都必须声明为特定的类型,并且该类型必须与变量在程序中赋给它的值相匹配。
以下是一些基本类型和示例
String foo = 'foo';
int bar = 0;
double foobar= 12.454;
bool isCool = true;
List<String> foobarList = ['foo', 'bar'];
字典(将键映射到值)在 Dart 中被指定为“Map”类型。您必须指定键类型和值类型,如下所示。
Map<String, int> grades = {
  'John': 99,
  'Doe': 30,
};
如果您将不兼容的类型赋给同一个变量,您将收到一个错误。
String errorExample = 'foo';
errorExample = 2; // ERROR
您可以使用“var”和“dynamic”使变量类型动态化,但这通常不是一个好主意,因为它可能导致以后出现令人沮丧的错误。
此外,Dart 具有独特的“final”和“const”运算符,可用于声明变量。“final”通常用于声明一个变量,该变量一旦声明就不会更改。例如,如果用户输入他们的名字并将其保存到变量中,我们知道该变量(他们的名字)不会更改,因此我们可以这样初始化/声明它
final String name;
“const”关键字的用途更具体——它仅使变量在编译时常量。它将在以后用于 Flutter 框架,但目前,请不要担心“const”。
函数
函数是通过指定返回类型、函数名称以及括号内的参数来声明的。如果没有任何返回,则使用 Void 指定返回类型。
// doesn't return anything but still executes some code
void main() {
  print('hello world');
}

// prints 'hello' but also returns the string 'complete'
String hello(int reps) {
  for (int i = 0; i < reps; i++) {
    print('hello');
  }
  return 'complete';
}

// returns a list of strings (List<String>)
List<String> people() {
  return ['John', 'Doe'];
}
异步函数是可以同时执行不同命令的函数——异步执行。
调用 API(基本上是尝试从 Web 中检索一些有用的信息或数据,这些信息或数据是由其他人编写的)就是异步函数可以发挥作用的一个例子。如果我们的函数调用 API 并将变量赋给 API 的响应,但我们的整个应用程序都在等待该函数完成执行才能执行某些操作,那么它效率不高。如果我们使此函数异步,那么调用 API 的函数就可以同时执行,而应用程序允许其他函数执行,或者在应用程序执行其他操作时执行。
在异步函数中,如果我们希望我们的函数在继续之前等待某行代码完成,我们只需在代码前面加上“await”关键字。
对于 Dart 中的异步函数,在括号和花括号之间添加“async”关键字,并将返回类型包含在“Future<[返回类型]>”中。
Future<String> retrieveData() async {
  String response = await someAPICall(); // assuming the api call returns a string
  return response;
}
条件语句
if 语句的编写方式如下
bool someCondition = true;

if (someCondition) {
  print('someCondition is true');
} else {
  print('someCondition is false');
}
循环
for 循环在所有编程语言中都非常重要,在 Dart 中有几种实现方式。
List words = ['hello', 'world', '!'];

// 1st way
// declare an int i, increment it by 1 until it is no longer
// less than words.length (3 in this case)
for (int i = 0; i < words.length; i++) {
  print(words[i]);
}

// 2nd way
// for each element in word, dart will take that element (in this case, a string, word)
// and will allow you to execute code using that element (here, we just print it out)
// the rocket notation (=>) allows us to write only a single statement to execute
// on the right side. otherwise, we would do (word) { print('hey!'); print(word); }
words.forEach((word) => print(word));

// 3rd way
// very similar to the 2nd way but a different syntax
for (String word in words) {
  print(word);
}
很酷!
类、对象和构造函数
类本质上是蓝图或模板,用于在程序中创建自己的数据类型。例如,如果您想编写关于汽车的程序,使用 String、int、bool 等原始数据类型会非常困难。
使用类,我们可以通过定义一个类及其属性来创建自己的数据类型或模型。这些属性是原始数据类型,但生成的类允许我们以更简单的方式编写更复杂的代码。
当我们hyperref为类创建特定实例(即我们想使用蓝图实际创建一辆汽车)时,我们用我们想要的属性“实例化”它,结果称为对象。
对象只是类的特定实例——类是“Car”,对象可能是像 Tesla Model S 这样的东西。您可能创建的另一个对象是 Lamborghini Aventador。您可以使用相同的类创建任意数量的对象!
类可以像这样创建和使用。请注意,实例化对象的类型是如何声明的,以及对象是如何实例化的。
class Car {
  String name;
  int price;
  bool isMadeByElonMusk;
}

void main() {
  // type 'Car'
  Car tesla = Car(); // class is instantiated with parentheses, ()
  // populating each of the attributes we defined in the above class
  tesla.name = 'Model S';
  tesla.price = 50000;
  tesla.isMadeByElonMusk = true;
}
现在,手动设置对象的所有属性会非常繁琐且效率低下。像 tesla.name、tesla.price 等这样的操作对我们来说不够好。
这就是构造函数的作用。构造函数允许我们在类中定义一个函数,该函数将为我们处理所有属性的设置。然后,要实例化一个类,我们只需要传递参数。请参阅下面的示例。
与类相关的另一个重要概念是方法。
方法是我们类中定义的函数,用于处理数据并执行与我们的类相关的特殊操作。例如,我们可能想检查我们的汽车是否昂贵。我们可以通过在类中定义一个 `isExpensive()` 方法来做到这一点。
请注意,在某个类中定义的方法可以访问在其上调用的对象相关的属性。如果 `isExpensive()` 方法在我们 `tesla` 对象上调用,它就可以访问 `tesla.price` 值。
// define a class named car
class Car {
  // define a constructor that takes in a String name, int price and bool isMadeByElonMusk
  Car(String name, int price, bool isMadeByElonMusk) {
    // set all the object's attributes equal to the inputs passed in
    this.name = name;
    this.price = price;
    this.isMadeByElonMusk = isMadeByElonMusk;
  }
  // defining the attributes of the class
  String name;
  int price;
  bool isMadeByElonMusk;

  // defining the method 'isExpensive' that returns type bool
  bool isExpensive() {
    // 'this.price' refers specifically to the price value of the object it was called upon
    if (this.price > 30000) {
      return true;
    } else {
      return false;
    }
  }
}

void main() {
  // instantiate the class by using its constructor, passing in the expected parameters
  // we defined already
  Car tesla = Car('Model S', 50000, true);
  // returns true by using the Car class's method, isExpensive, because tesla.price = 50,000
  bool isCarExpensive = tesla.isExpensive();
}
更多 Dart 资源
一如既往,请确保经常复习这些概念以熟悉它们。以下是我在学习过程中发现非常有用的更多资源,可以帮助您将它们牢记于心。
请参阅“code”文件夹中的 dart_examples.dart 文件,以查看此 Dart 教程中的所有示例。
学习 Flutter UI
现在您已经了解了一些 Dart 编程语言的基础知识,让我们来看看 Flutter 框架。
目录
首先,我们将为 Flutter 安装一个编程环境。
安装
根据操作系统,安装过程对某些用户来说可能有点棘手,但也不是太糟糕。请遵循这些资源来为您的操作系统安装 Flutter 和必要的工具(除了 Flutter,您还需要一个模拟器/虚拟手机才能测试您的应用程序)。
Windows
MacOS
Linux
完成后,在终端中运行此命令以确保您的环境已准备就绪。
$ flutter doctor
使用以下命令创建一个 Flutter 项目。
$ flutter create <project_name>
文件夹结构将如下所示。我们将在“lib”文件夹中放置所有代码,稍后将在指南中解释其他文件夹。现在,只需按照指南中的代码进行操作,暂时不要担心项目设置。
做得好!现在我们已经设置好了环境,让我们来看看 Flutter 框架中应用程序的布局方式。
小部件
Flutter 应用程序是使用称为小部件 (Widgets) 的东西构建的。如果您熟悉前端 JavaScript 框架,它们类似于组件,但许多都是由框架预先构建的。小部件也与 HTML 元素非常相似,例如“p”(用于段落)、“h1”(用于标题 1)等。
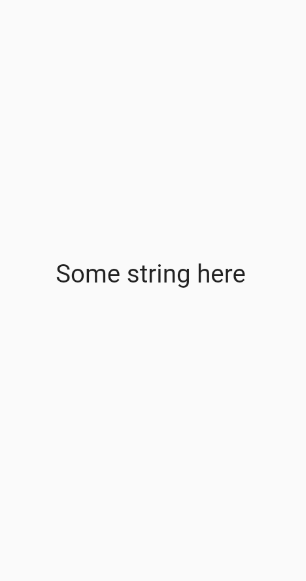
小部件本质上是 Flutter 为我们创建的应用程序的基本元素或构建块。它们通过 Flutter 期望您的特定属性或参数进行实例化。例如,要在应用程序屏幕上显示文本,我们使用一个称为 Text 小部件的小部件,它类似于 HTML 的“p”元素,通过传递字符串来实例化。这是它的代码和在应用程序中的样子。
// displays the text on the app screen
Text('Some string here');
Flutter 库中还有一个预构建的按钮小部件,称为 ElevatedButton(只是一个 Material 主题按钮),它接受一个 `onPressed` 属性(按钮按下后要执行的代码)和一个 `child` 属性(显示按钮文本的 Text 小部件)。另一个是 TextField,它处理输入文本。
布局
小部件也用于比显示文本或按按钮更复杂的事情。Flutter 在应用程序中布局事物的方式也是通过小部件完成的。例如,Container 小部件,它类似于 HTML 中的“div”,它允许我们将另一个子小部件包装在一个容器中,以便添加填充、边距、颜色或其他内容。内部小部件通常称为“child”小部件,容器将是“child”小部件的“parent”小部件。有道理吧?
Container(
  child: Text('hello!' )
),
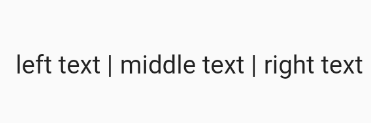
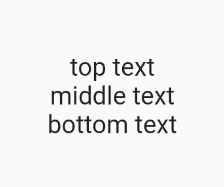
其他重要的布局小部件是 Row 和 Column 小部件。这些小部件允许您在屏幕上水平或垂直堆叠小部件。它们通过传递子小部件列表来实例化。以下是它们的工作方式。
Row(
  children: [
    // in the app, child widgets of a row are laid out left to right like so
    Text('left text'),
    Text('middle text'),
    Text('right text'),
  ],
)

Column(
  children: [
    // child widgets of a column are laid out top to bottom like so
    Text('top text'),
    Text('middle text'),
    Text('bottom text'),
  ],
)
左:Row
右:Column
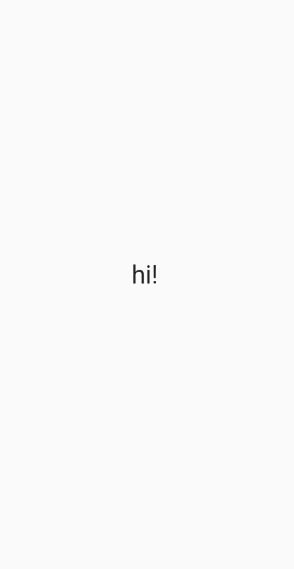
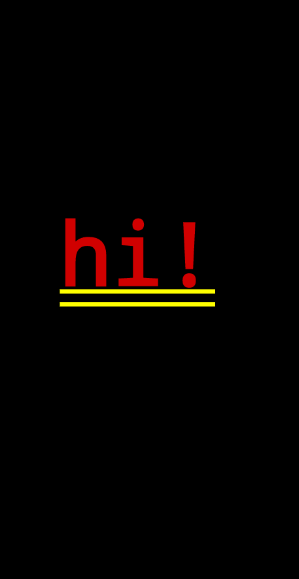
一些布局小部件包装了我们放在屏幕上的所有其他小部件。例如,Scaffold 小部件通常用于为我们布局或“脚手架”屏幕,它的用法如下
Scaffold(
  body: Container(
    child: Text('hi!'),
  ),
)
注意:Scaffold 对页面应用基本样式,例如使背景颜色为白色,使文本为黑色,设置默认字体大小等。没有 Scaffold,您基本上是将纯粹的或原始的小部件渲染到一个完全空白的屏幕上,该屏幕几乎没有应用任何数据或样式。
左:带 Scaffold
右:无 Scaffold
另一个有用的部件是 `ListView.builder` 部件。`ListView.builder` 部件接受两个主要参数 - `itemCount`(要构建的列表项数量)和 `itemBuilder`(它将返回实际构建的内容)。这是它的样子。
List<String> people = ['John', 'Doe', 'Jane'];

ListView.builder(
  itemCount: people.length, // 3
  // index is the current index that the builder is iterating on. think of it like the
  // 'i' in the for loop,  for (int i = 0; i < whatever; i++)
  itemBuilder: (context, index) {
    return Container(
      child: Text(people[index]),
    );
  },
)
稍后我们将通过截图看到它们的外观。
属性/参数
Flutter 构建的每个小部件都可以传递许多属性或参数。正如我们之前看到的,Container 小部件接受一个 `child` 属性,它还可以接受一个 `color` 属性来定义 Container 的背景颜色。
每个小部件将具有一些特定于该小部件的参数,您可以通过阅读 Flutter 文档或使用 IDE/文本编辑器的智能感知来了解它们。例如,在 VS Code 中,您可以在键入小部件后按 Ctrl+Space 或将鼠标悬停在上面,以查看它可以使用哪些属性。
通常,您也可以通过参数将所有样式传递给小部件。
许多这些参数仅接受非常特定的类型或对象。Container 小部件的 `child` 属性将只接受另一个 Flutter 小部件。`color` 属性将只接受 Flutter 预定义的(如 `Colors.black`、`Colors.blue` 等)对象或以特定方式实例化的对象(`Color(0xFFFFFFFF)`,这是使用十六进制代码的一种方式)。
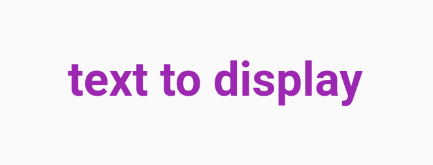
在 Text 小部件中,我们可以通过将一个用我们的样式实例化的 `TextStyle` 对象传递到 Text 小部件的 `style` 属性来设置文本样式。请注意,`color` 属性如何接受来自 Flutter 库的 `Color` 对象 `Colors.purple`。此外,`fontWeight` 属性接受 `FontWeight` 对象。
Text(
  'text to display',
  style: TextStyle(
    // font color
    color: Colors.purple,
    // font size
    fontSize: 16.0,
    // font weight
    fontWeight: FontWeight.bold,
  ),
)
对于 Container 小部件中的样式,我们使用 `decoration` 属性并传递一个用我们的样式实例化的 `BoxDecoration` 对象。
Container(
  // styling the container
  decoration: BoxDecoration(
    // you can define the background color in this object instead
    color: Colors.blue,
    // border radius - valid arguments must be of class BorderRadius
    borderRadius: BorderRadius.circular(20.0),
  ),
  height: 50.0,
  width: 50.0,
  // margin of the container - argument must be of class EdgeInsets
  margin: EdgeInsets.all(8.0),
  // child element (using the Center widget centers the Text widget)
  child: Center(
    Text('hello!')
  ),
)

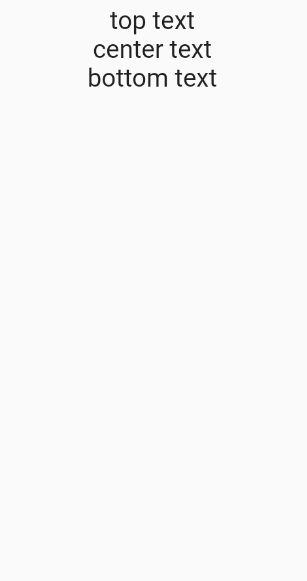
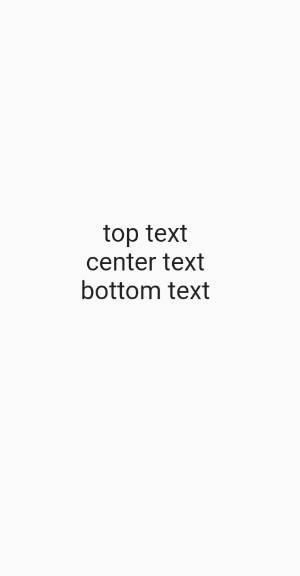
在 Column 小部件中,您可能需要将对象垂直对齐到页面中心。以下是如何使用 Column 小部件的 `mainAxisAlignment` 属性(Column 的主轴是垂直的)来完成此操作。您还可以使用 `crossAxisAlignment` 属性在 Column 小部件中水平对齐文本。
Column(
  // argument passed in must use the MainAxisAlignment object
  // can you start to see the practices and conventions Flutter everywhere?
  mainAxisAlignment: MainAxisAlignment.center,
  children: [
    Text('top text'),
    Text('center text'),
    Text('bottom text'),
  ],
)
左:无 MainAxisAlignment.center
右:带 MainAxisAlignment.center(如上面的代码示例所示)
Column 的其他属性包括 `crossAxisAlignment`、`mainAxisSize` 等。很有可能,如果您觉得需要对小部件进行样式设置,只需在 Google 上搜索该小部件的属性,或者搜索如何完成您需要的事情以找到要使用的属性。
您需要学习的属性和类的数量可能看起来有些令人生畏,但随着时间的推移,它会变得直观(此外,Google 是您最好的朋友!)。
格式化
现在,您可能想知道,到处都是逗号和新行是什么鬼?我之所以这样布局代码,是因为您的 IDE 会为您格式化代码。它通过检测尾随逗号并添加相应的换行来实现。
遵循格式化程序将使您的代码对您和他人来说都更具可读性。这是一个简单的例子。
// weird code you might write totally without a formatter
// not very good, is it?
Column(children:[
  Container
  (child: Text
  (
    'hi!'
  )),
  Text(
    'hi'
  )
]
)

// code you might write with the formatter, but without adhering to the formatting guidelines
Column(children: [
  Container(color: Color(0xFFFFFF), child: Text('hey there'), margin: EdgeInsets.all(5.0), padding: EdgeInsets.all(5.0)),
  Text('hi')])

// code you write with the formatter, that adheres to the formatter
Column(
  children: [
    Container(
      color: Color(0xFFFFFF),
      child: Text('hey there'),
      margin: EdgeInsets.all(5.0),// add a trailing comma to the last parameter (margin)
    ), // add a trailing comma to the Widget
    Text('hi'), // add a trailing comma to the last child of the Column
  ], // add a trialing comma to the children parameter
)
您是否同意我说的最后一个示例是最容易阅读和最容易编码的(不考虑注释)?
只需在您的小部件及其参数后面添加一个尾随逗号,然后保存,格式化程序就会为您处理其余的事情。随着时间的推移,您会越来越熟练。
无状态小部件
无状态小部件本质上是不会改变的小部件——它们是静态的。无状态小部件的一个示例是显示美国各州名称列表的页面。让我们通过创建一个仅返回白色容器的无状态小部件来创建一个更简单的示例。这是定义无状态小部件的语法。
class ListOfStates extends StatelessWidget {
  // this is the constructor, but don't worry about it right now
  const ListOfStates({Key? key}) : super(key: key);

  // @override is good practice to tell us that the following method (in this case,
  // the build method) is being overriden from the default build method
  @override
  // this build function returns a Widget
  Widget build(BuildContext context) {
    return Container(color: Color(0xFFFFFFFF));
  }
}
好消息——大多数 IDE 都包含代码片段,可以自动为您创建无状态小部件!只需在 IDE 中键入 `stless`,然后按 TAB 或 Enter 即可生成所有必需的代码。
如果您想为无状态小部件添加参数(例如,创建一个 `message` 参数传递给显示该消息的无状态小部件),我们需要以与构造类相同的方式使用构造函数。这是如何操作。
class DisplayMessage extends StatelessWidget {
  // add it to the constructor here after the key, as 'required this.<parameter>'
  DisplayMessage({ Key? key, required this.message }) : super(key: key);

  // initialize it as a 'final' variable (it won't change)
  final String message

  @override
  Widget build(BuildContext context) {
    return Container(
      child: Text(message),
    );
  }
}
然后,该小部件将在另一个父小部件中这样实例化
Scaffold(
  body: Column(
    children: [
      ...
      // instantiating the stateless widget we just created (which is in another file)
      // with string, the message we want to display
      DisplayMessage(message: 'Hello there!'),
      ...
    ],
  ),
)
有状态小部件
有状态小部件是能够对某些更改做出反应然后重新构建的小部件。如果我们要使应用程序具有交互性,这会很有用。例如,假设我们想在应用程序中有一个计数器。每当用户按下“+”按钮时,我们希望应用程序显示我们定义的变量 `count` 的增加。这是如何操作。
注意:每当我们希望有状态小部件对任何更改做出反应时(这需要 Flutter 重新构建页面),我们使用 `setState(() {})` 方法。
class DisplayCount extends StatefulWidget {
  const DisplayCount({Key? key}) : super(key: key);

  @override
  _DisplayCountState createState() => _DisplayCountState();
}

class _DisplayCountState extends State<DisplayCount> {

  // defining a variable, count, inside our widget
  int count = 0;

  @override
  Widget build(BuildContext context) {
    return Column(
      children: [
        // display the count as a string
        Text(count.toString()),

        ElevatedButton(
          // the text displayed on the button
          child: Text('Click me to add +'),

          // the code that will execute when the button is pressed
          onPressed: () {
            // setState is called to signal to Flutter to rebuild the widget
            // count is incremented by 1, so the widget will be rebuilt with
            // a new value displayed in the text widget above
            setState(() {
                count += 1;
            });
          },
        ),
      ],
    );
  }
}
我们也有有状态小部件的 IDE 代码片段。只需键入 `stful`。
有状态小部件中的构造函数是相同的,但它们仅在 `DisplayCount` 小部件中声明,而在 `_DisplayCountState` 小部件中不声明。在 `_DisplayCountState` 小部件中,您将放置代码,可以这样引用变量(`widget.[variable]`)。
class DisplayCount extends StatefulWidget {
  const DisplayCount({Key? key, required this.message}) : super(key: key);

  final String message;

  @override
  _DisplayCountState createState() => _DisplayCountState();
}

class _DisplayCountState extends State<DisplayCount> {
  ...
  @override
  Widget build(BuildContext context) {
    return Column(
      children: [
        // refer to the 'message' attribute defined above as widget.message
        Text(widget.message),
        ...
      ],
    );
  }
  ...
}
有状态小部件的实例化方式与无状态小部件相同。
有状态小部件对于处理与业务逻辑、交互式功能以及侦听后端数据流相关的任何内容都非常有用,我们稍后将看到。
空安全
在 Flutter 的最新版本中,引入了空安全,以极大地帮助开发人员处理臭名昭著的空错误。
基本上,如果像 String 这样的东西被声明并应该被赋一个有效值,比如“Hi!”。如果它以某种方式被赋了一个空值(基本上,被赋了一个什么都没有的值),那么就会开始出现各种问题——有些部分可能会开始缺少文本、功能等。
Flutter 的空安全通过使用强大的 IDE 功能强制开发人员更严格地进行空检查来帮助开发人员解决这些问题。这意味着开发人员必须考虑他们声明的变量可能取空值的情况。
在空安全中,有 3 个重要符号需要了解:`?` 符号、`!` 符号和 `??` 符号。
'?'
如果我们声明了一个我们认为可能取空值的变量,我们在类型声明的末尾添加 `?` 运算符,以提醒我们和 IDE 对该变量进行严格的空检查。这是一个例子。
// initializing a string wih a nullable type and assigning it to the
// return value of this function, fetchSomeDataOrSomething()
String? response = await fetchSomeDataOrSomething();
// in the case that the function returned something null and response has a null value,
// it is now safely accounted for with this conditional statement
if (response != null) {
  print(response);
} else {
  print('error');
}
'!'
如果我们为变量声明了一个可空类型,但我们确信它不会为空,我们在变量名末尾使用 `!` 运算符。注意:尽量避免使用此选项,因为它会绕过 IDE 执行的所有空安全检查。
// fetchSomeData() returns type bool
bool? response = fetchSomeData();
// declaring that response will always be a valid value and not null
if (response! == True) {
  print('function has returned true');
} else {
  print('function has returned false');
}
'??'
当我们给变量赋值时,我们可以检查它是否为空,并从此开始赋值。如果它赋的值为空,我们可以添加 `??` 运算符并在右侧添加一个默认值,以防它为空。
String? response = fetchSomething();
// if response is not null, the 'something' variable will take on the value of response'
// if response is null, the 'something' variable with take on the value on the right side
String something = response ?? 'defaultValue';
更多 Flutter 资源
好的,这信息量很大!回顾所有这些概念并真正将它们在实际项目中看到的有用方法是观看 YouTube 上的 Flutter 应用构建。
一个特别出色的频道对我帮助很大的是 Marcus Ng。他的“从零开始构建应用”系列包含他从头开始构建用户界面的内容,他会解释他每一步的操作。请查看他的频道并观看该系列!
另一个很棒的频道是 The Flutter Way。这些视频是他用快速编码构建极其设计精良且美观的 Flutter 用户界面的视频,您可以从中看到他是如何遵循某些约定和良好实践的。我建议您查看他的频道并观看他的一些应用构建!
请参阅“code”文件夹中的 flutter_examples.dart 文件,以查看本教程此部分的所有代码片段(用作参考)。
学习 Firebase
Firebase 是一个用于开发移动和 Web 应用程序的平台。它是在不创建自己的服务器或 API 的情况下处理后端或数据的便捷方式。
由于 Flutter 是由 Google 开发的,而 Firebase 也由 Google 开发(最初是为创建应用程序而设计的),因此 Flutter 和 Firebase 可以很好地协同工作,作为前端和后端工具。
大多数项目的主要后端将使用数据库,Firebase 通过其 Cloud Firestore 数据库提供。Firestore 数据库的基本结构非常简单,但与传统的实时数据库(如 SQL)有很大不同。相反,Firestore 是一个 No-SQL 数据库。
本系列对于熟悉 Firebase 结构非常有帮助,因此请务必查看。第 1、2 和 4 集尤为重要。
基本上,Firebase Firestore 数据库是通过创建顶级“集合”来创建的,这些集合可以是“Users”、“Messages”、“Products”等。这些集合中可以包含文档。
文档是其父集合的特定实例,可以为其分配一系列具有相应值的“字段”。例如,Macbook Pro 文档在 Products 集合中可能如下所示
左侧:集合,中间:集合的文档,右侧:此文档中的字段
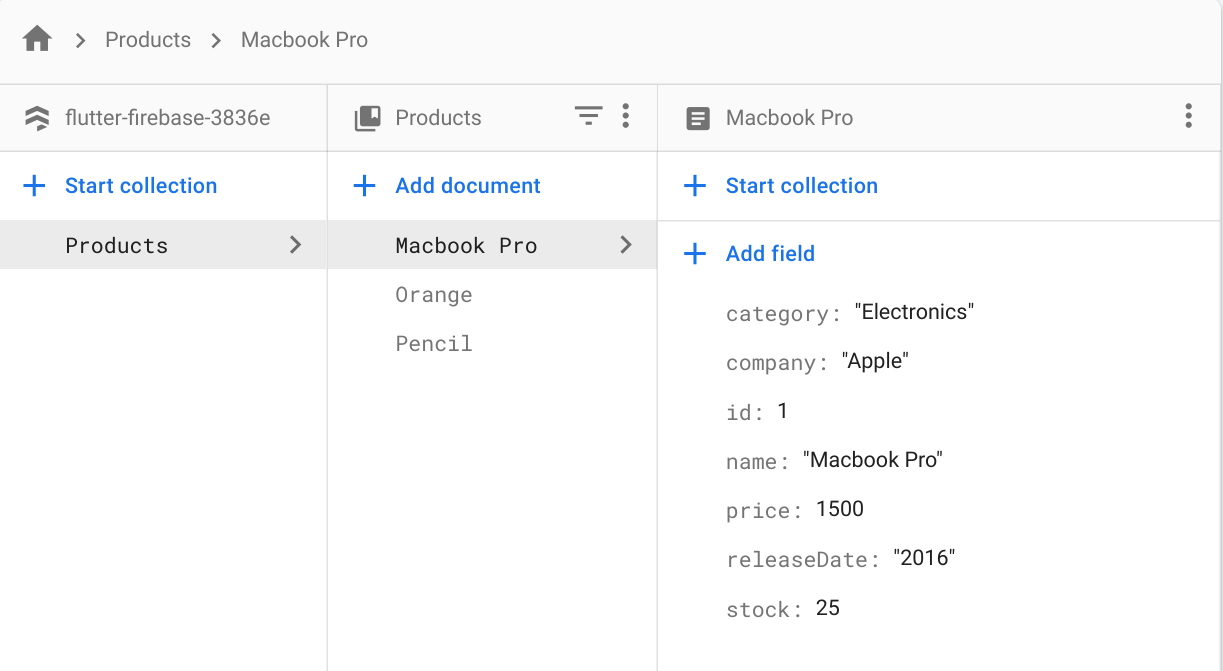
注意:我正在通过 Firebase Console 访问我创建的虚拟项目中的 Cloud Firestore 数据库
No-SQL 数据库的特点是您可以在同一集合中创建没有相同字段的文档!!例如,“Pencil”文档可能缺少“rating”字段,但不会出现任何错误。
关于 Firebase 的其他一些重要事项是账单和安全规则。
Firestore 的账单收费不是按数据库大小收费,而是按对数据库的读写次数收费。例如,如果您创建一个电子产品(以文档形式)并将其添加到数据库,它将计为一次写入。如果您想更新产品价格,它也将计为一次写入。
如果您需要加载“Food”集合的所有产品,Firebase 将对集合中的每个文档收费 1 次读取。
然而,Firebase 在其限制方面相当慷慨。但是,如果您想将应用程序投入生产(将其推向实际世界),最好注意账单如何工作以优化您的数据库调用。
查看 Firebase 定价页面 了解免费套餐的限制。
更多非常有用的资源
将 Firebase 与 Flutter 连接
现在我们了解了 Firebase 最重要的部分(Firestore 数据库),如何在 Flutter 中访问这些数据?
StreamBuilder
我们可以为此目的使用 `StreamBuilder`。“Stream”本质上只是一个我们持续监视变化的数据流。数据流的一端是 Firestore 数据库。数据流的另一端是我们的应用程序。
因此,当 Firestore 数据库中的某些内容发生变化时(例如,添加了一个新产品),该变化会通过数据流向下传递并被我们的 Flutter 应用程序注意到。一旦注意到该变化,`StreamBuilder` 小部件就会重新构建自身以合并该变化(新产品现在会出现在我们的应用程序上)。
这是语法
StreamBuilder(
  // gets an instance of a Firestore database and retrieves 'snapshots' of the Macbook Pro document
  stream: FirebaseFirestore.instance.collection('Products').doc('Macbook Pro').snapshots(),
  // builder defines what will be built on the app using this 'snapshot' data (the stream data)
  // Firestore collections are of type QuerySnapshot
  // Firestore documents are of type DocumentSnapshot
  // Both are referred to as AsyncSnapshots because they are asynchronous snapshots
  builder: (BuildContext context, AsyncSnapshot<DocumentSnapshot> snapshot) {
    // check that there is data in the stream and that it has finished loading
    if (snapshot.hasData) {
      return Container(
        // snapshot.data gives you access to all the fields in the document
        // get the values of the fields by using square brackets and the
        // name of the field, like so
        child: Text(snapshot.data['name'])
      ),
    }, else {
      // if there's no data yet, show a loading sign
      return CircularProgressIndicator();
    }
  },
)
它可能看起来很复杂,但实际上并非如此。一方面,您正在访问数据流,无论是集合还是文档,并且您正在构建一个通过 `snapshot` 变量访问该数据的小部件。如果 `StreamBuilder` 在 Firestore 端检测到任何更改,该小部件将被重建。
FutureBuilder
`StreamBuilder` 很好,但如果您不需要侦听 Firestore 端的变化怎么办?如果您只想检索某些信息,比如 Macbook 的价格,然后就完成了(您可能知道这些值不会改变)?
我们可以使用 `FutureBuilder` 来做到这一点。
`FutureBuilder` 将一个异步函数作为参数,并将一个构建器用于在函数执行完成后构建某物(类似于 `StreamBuilder`)。在我们的示例中,我们的异步函数或“future”(`FutureBuilder` 这样称呼它)将是检索 Macbook 的价格,而我们的构建器将是显示该价格的小部件。
// defining an async function that returns an int
Future<int> retrieveMacbookPrice() async {
  // PS here's how to retrieve a single document from Firestore -
  // in our case, the Macbook document
  var document = await FirebaseFirestore.instance.collection('Products').doc('Macbook Pro').get();
  // The data you get back (the document and its fields) will be a dictionary that maps
  // keys (type String) to values (type dynamic)
  Map<String, dynamic> macbookData = document.data();

  int macbookPrice = macbookData['price'];
}

FutureBuilder(
  // builder will only build after this 'future' function is done executing
  future: retrieveMacbookPrice(),
  // the 'snapshot' here refers to what is returned from the future!
  builder: (BuildContext context, AsyncSnapshot<int> snapshot) {
    if (snapshot.hasData) {
      // data from the snapshot is accessed like so
      int price = snaphot.data['price']
      return Container(
        // convert int to string
        child: Text(price.toString()),
      );
    } else {
      // if there's no data yet, show a loading sign
      return CircularProgressIndicator();
    }
  }
)
哇,信息量很大!但猜猜怎么着……现在您了解了 Firebase、`FutureBuilder` 和 `StreamBuilder` 的工作原理,您在创建健壮的 Flutter 应用程序的旅程中已经走了很远。
状态管理
状态管理是 Flutter 中的一个非常重要的概念,它是这样进行的
假设您想制作一个跟踪用户个人资料和信息的应用程序。在他们用用户名和密码登录后,您想在应用程序的每个页面上显示他们的用户名作为问候语(例如,“Hello, [name]!”)。您将如何做到这一点?您如何将用户“username”和“password”的值传递到整个应用程序?
您可以将用户名作为参数传递给构成不同页面的所有无状态和有状态小部件。但实际上,您需要一个保存该用户名值的对象,以便在所有屏幕/页面中访问它。
这可以通过使用内置状态管理解决方案的“Provider”小部件来完成。
Provider 被称为“Provider”,因为它是一个父小部件,它“提供”一个值传递给子小部件,以便子小部件可以访问该值/实体中的所有内容。在我们的示例中,如果我们有一个我们想在子小部件中访问的“Cart”类,它看起来会是这样
Provider(
  create: (context) => CartModel(),
  child: MyApp(),
)
因此,在 `MyApp` 子小部件中,我们将可以访问 `CartModel` 及其所有方法等。您可以通过两种方式实例化 `CartModel` 类来访问数据
// 1st way
Provider.of<CartModel>(context).removeAllItems();

// 2nd way
// context.watch listens for changes in CartModel - if data changes, the parent will rebuild
// whatever is necessary
context.watch<CartModel>().removeAllItems();
// context.read returns CartModel / the model of interest without listening to changes in
// the data
context.read<CartModel>().removeAllItems();
这会调用 Provider 来查看 `CartModel` 类型的模型,并调用 `removeAllItems()` 方法。第二种方式,`CartModel` 类型的对象(`< >` 之间的任何内容)通过括号实例化 -> `context.read< >()`。
如果我们想访问另一需要状态管理的数据——比如用户对应用程序颜色主题的偏好怎么办?我们可以创建一个名为 `UserPreferences` 的类,但是如何在我们已经有的 `CartModel` 类之上访问它?
一种方法是嵌套 Providers。
Provider(
  create: (context) => CartModel(),
  child: Provider(
    create: (context) => UserPreferences(),
    child: MyApp(),
  ),
)
因此,我们将在 `MyApp` 中访问 `UserPreferences` 模型和 `CartModel`。但您可能已经注意到,这样会很快变得难以管理,对吧?这就是 `MultiProvider` 的用武之地。
“MultiProvider”小部件允许我们在应用程序的顶部(`main.dart`)定义多个“provider”,所有子小部件都可以访问每个 provider。
MultiProvider(
  providers: [
    Provider<CartModel>(create: (_) => CartModel()),
    Provider<UserPreferences>(create: (_) => UserPreferences()),
  ],
  child: MyApp(),
)
多么自然的进步!
这就是状态管理的基础。查看下面列出的额外资源以更熟悉这些概念和语法。此外,请参阅“code”文件夹中的 advanced_flutter_examples.dart 文件,以查看本教程此部分提供的所有示例(用作参考)。
最佳实践
在 Flutter 中开发任何大型项目时,始终牢记最佳实践非常重要。
文件夹结构
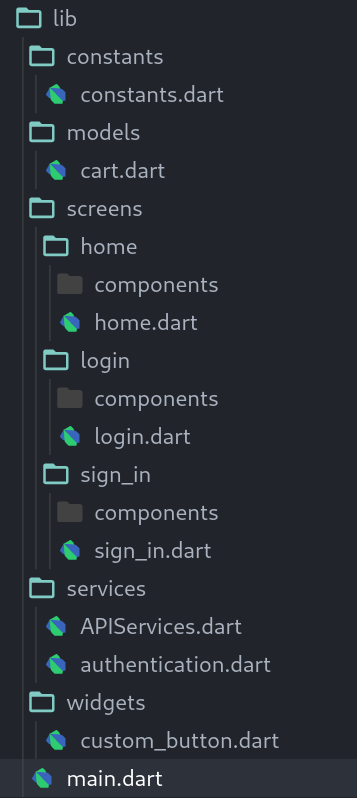
为了维护一个大型项目,请确保您的文件夹结构组织正确。
文件夹通常这样组织
正如我们之前看到的,`lib` 是您放置所有 Flutter 代码的地方。Flutter 然后将代码转换为 Android 和 iOS 代码以创建原生应用,这些代码可以在 `android` 和 `ios` 文件夹中找到。您使用的任何图片、SVG 或照片都应放在您创建的“assets”文件夹中。
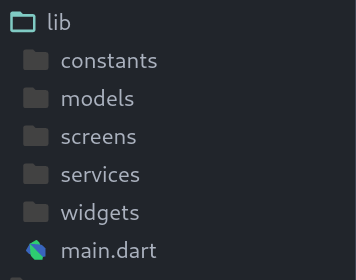
在 `lib` 文件夹中,您应该将代码分成 screens、models、services、widgets 和 constants。`main.dart` 将是您的包装文件。
`Constants` 用于放置 `constants.dart`,它通常定义应用程序的 `ThemeData` 和颜色方案,以便您的应用程序更容易遵循某种样式。例如,我通常在 `constants.dart` 文件中定义 `kPrimaryColor` 和 `kSecondaryColor`。您也可以使用 `theme.dart` 文件来创建 `ThemeData` 对象。
Models 是您想要创建的类,以便更轻松地在 Flutter 中处理数据。例如,您可能想创建一个 `User` 类,该类具有“username”、“nickname”、“age”等属性。在 models 文件夹中,根据您想如何命名您的类来创建和命名您的文件。如果我想创建一个...
class User {
  String username;
  String nickname;
  int age;
}
那么我会将文件命名为 `user.dart`(如果它是两个单词,只需使用下划线而不是空格 -> `food_item.dart`)。
`Screens` 是您将放置大部分代码的文件夹 - 所有屏幕的 UI 代码。要创建一个新屏幕,请创建一个文件夹并将其命名为屏幕,然后将您的代码放在该子文件夹中。这样,您的所有屏幕都将是“screens”文件夹中的不同文件夹。在您的特定屏幕文件夹中,将主文件命名为(`name_of_screen`).dart。
如果您的屏幕有很多组件,请在屏幕目录中创建一个 components 文件夹。
`Services` 用于放置包含任何业务逻辑的所有类。这些遵循与 models 文件夹相同的文件夹约定。
`Widgets` 用于放置您自定义创建的所有小部件,这些小部件您用于多个屏幕。例如,如果您创建了自己的 Button 小部件,并且想在 login 和 sign_in 屏幕上都使用它,只需将该 Button 文件放入 widgets 文件夹。
将业务逻辑与前端分离
业务逻辑本质上是与应用程序布局不直接相关的任何代码。例如,如果您有一个登录屏幕,UI 将是 Column、TextField 和 ElevatedButton 小部件。业务逻辑将是如何让用户登录到您正在使用的后端服务器(例如 Firebase)。
通常最好将它们分开,这样就不会混合后端/处理数据和前端,这可能导致混乱和令人困惑的代码。如果我想查看 `product_details` 屏幕的代码,为什么我还要看产品如何在后端处理?将这两种范例分开会更清晰。
这对我们来说意味着,我们应该尽可能多地将业务逻辑/后端代码放在“services”文件夹中,而不是放在“screens”文件夹中。我通常通过定义一个 `APIServices` 类来实现这一点,该类具有处理业务逻辑的多个方法。
尽可能抽象(创建更多小部件)
在 Flutter 中,提取尽可能多的代码对您最有利。这意味着每当您有一个专门用于单一用例的小部件树部分时,就将其提取到自己的小部件中并放在别处。这是一个例子。
// products_screen.dart

Scaffold(
  // Column widget to lay out everything on the page vertically
  body: Column(
    children: [
      // nested column widget dedicated to displaying electronics
      Column(
        children: [
          Container(child: Text('Electronics')),
          Text('Macbook pro'),
          Text('iPhone'),
          Text('Galaxy Buds'),
        ],
      ),
      // nested column widget dedicated to displaying food
      Column(
        children: [
          Container(child: Text('Food items')),
          Text('Jelly beans'),
          Text('Peanut Butter'),
          Text('Apples'),
        ],
      ),
    ],
  ),
)
这将把“Food items”部分和“Electronics”部分放在一个单一的小部件树中,如果项目变大,这会变得混乱和令人困惑。作为最佳实践,它看起来应该是这样的。
// screens/products/products_screen.dart

Scaffold(
  body: Column(
    children: [
      // Extracted widgets (put the widgets into their own file in the 'components' directory of this screen's directory)
      ElectronicsSection(),
      FoodItemsSection(),
    ],
  ),
)

// screens/products/components/electronics_section.dart

class ElectronicsSection extends StatelessWidget {
  const ElectronicsSection({ Key? key }) : super(key: key);

  // same widgets, just put into the build function as a returned value
  @override
  Widget build(BuildContext context) {
    return Column(
      children: [
        Container(child: Text('Electronics')),
        Text('Macbook pro'),
        Text('iPhone'),
        Text('Galaxy Buds'),
      ],
    );
  }
}


// screens/products/components/food_items_section.dart

class FoodItemsSection extends StatelessWidget {
  const FoodItemsSection({ Key? key }) : super(key: key);

  // same widgets, just put into the build function as a returned value
  @override
  Widget build(BuildContext context) {
    return Column(
      children: [
        Container(child: Text('Food items')),
        Text('Jelly beans'),
        Text('Peanut Butter'),
        Text('Apples'),
      ],
    );
  }
}
结果更清晰,调试和编码也更容易。
测试
为您的 Flutter 应用程序创建单元测试是确保添加新功能不会破坏代码的一种便捷方法。
测试是为了自动化检查应用程序中特定功能的流程。例如,您可以编写一个单元测试来确保登录屏幕和业务逻辑正常工作,您可以在每次更改应用程序的其他部分时运行它。
请查看这些资源以了解 Flutter 中的测试。
挑战项目
现在您已经了解了 Flutter 的基本语法和工作原理,您需要将其付诸实践!我建议首先遵循 Flutter 应用构建教程(上面 提供)来了解高级编码人员如何开发应用程序,然后尝试自己仅使用 UI 组件编写应用程序(您可以在 dribbble 上寻找 UI 灵感)。
为了稍微帮助您,我选择了一个 dribbble 帖子,您可以尝试在自己的 Flutter 项目中实现。

这是由 Risang Kuncoro 创建的一个 dribbble 帖子,它包含一个旅行应用程序的 2 个屏幕。挑战是(几乎)完美地在您自己的 Flutter 项目中重新创建此应用程序。
对于页面上的所有信息,您可以将其硬编码到您的应用程序中,但随意尝试创建简单的业务逻辑(例如,为每个位置创建模型)作为额外的挑战。
提示:除了其他内容,您还需要利用……
- Stack 小部件
- Icon 小部件
- AssetImage 小部件
- 用于构建导航栏 -> `bottomNavigationBar: BottomNavigationBar(...)`
- 用于导航到另一页 -> `Navigator.push(context, MaterialPageRoute(...))`
- 等等!
如果您在过程中遇到任何问题,请记住 Google、Stack Overflow 和 Flutter 文档是您最好的朋友!
有用的资源
现在您已经学会了语法并尝试自己实现了一个 Flutter 项目,祝您在创建自己的精美 Flutter 应用的旅程中好运!
为了帮助您完成剩下的旅程,这里列出了所有汇编的资源,按从初学者友好到更高级的顺序排列。
Dart
Flutter
Flutter 应用教程
- Flutter 课程 - 完整入门教程(构建 iOS 和 Android 应用)
- Flutter 聊天 UI 教程 | 从零开始构建应用
- 使用 Flutter 和 Firebase 身份验证和 Firestore 的 Flutter 应用教程 - 加密钱包
- 植物应用 - Flutter UI - 快速代码
Firebase
状态管理
- Flutter 文档 - 简单的应用状态管理
- Flutter 中的 Stream Builder
- 理解所有那些 Flutter Providers
- Flutter Provider - 高级 Firebase 数据管理
如果这让您感到不知所措,请不要气馁。我曾经被难住过很多次,但一旦我理解了一个新概念,我就很快取得了很大的进步。永远不会太晚。很高兴您一开始就在这里!
希望您喜欢这个全面的指南!


