
超赞的 Flutter 技巧和窍门
提示 1:stless & stful
我们可以输入stless和stful,然后我们就会得到自动完成建议,分别生成无状态的 Flutter Widget 或有状态的 Flutter Widget。
提示 2:If Null 操作符 (??)
?? 检查某项是否为null。如果不是null,它会返回自身的值;但如果它是null,它会返回??之后的值。
return abc??10; //如果 abc 是 null 则返回 10,否则返回其自身的值,
它也有一个简写赋值,当它为 null 时。
abc??=5 //如果 abc 是 null 则将其赋值为 5
testOldMethod() {
  print("NullChecking in old way");
  var abc;

  if (abc == null) {
    print("It's null");
  } else {
    print(abc);
  }

  if (abc == null) {
    abc = 5;
  }
}

testIfNullOperator() {
  print("NullChecking with if Null Operator");
  var abc;

  print(abc ?? "It's null");
  abc ??= 5;
  print(abc ?? "It's null");
}
输出
NullChecking in old way
It's null
5
--------------------
NullChecking with if Null Operator
It's null
5
提示 3:内部函数
我们可以在一个函数内部定义另一个函数。
这是为了将内部函数与外部函数之外的所有其他东西隔离开来。
main() {
  String getName() {

    String getFirstName() { return "Laxman"; }

    String getLastName() { return "Bhattarai"; }

    return getFirstName() + " " + getLastName();
  }

  print(getName());
}
输出
Laxman Bhattarai
提示 4:..级联..链式..流式 API
我们可以链接方法/成员调用,而无需从方法()、getter() 和 setter()返回this,可以使用级联操作符 (..)
请在 Dartpad 中尝试
之前
class User {
  String name;
  int age;

  User({this.name = "Foo", this.age = 0});

  User withName(String name) {
    this.name = name;
    return this;
  }

  User withAge(int age) {
    this.age = age;
    return this;
  }

  void printId() => print("$name is $age years old.");
}

main() {
  User()
  .withAge(27)
  .withName("Laxman")
  .printId();
}
可以替换为
class User {
  String name;
  int age;

  void printId() => print("$name is $age years old.");
}

main() {
  User()
  ..age = 27
  ..name = "Laxman"
  ..printId();
}
提示 5:Dart 数据类
Dart 默认不支持数据类,但通过插件,我们可以轻松生成数据类(由工具实现了copyWith()、fromMap()、toMap()、命名构造函数、toString()、hashCode() 和equals() 方法)。
?❗️注意❗️?:您的光标应位于您想要生成数据类的类内部。
下载插件
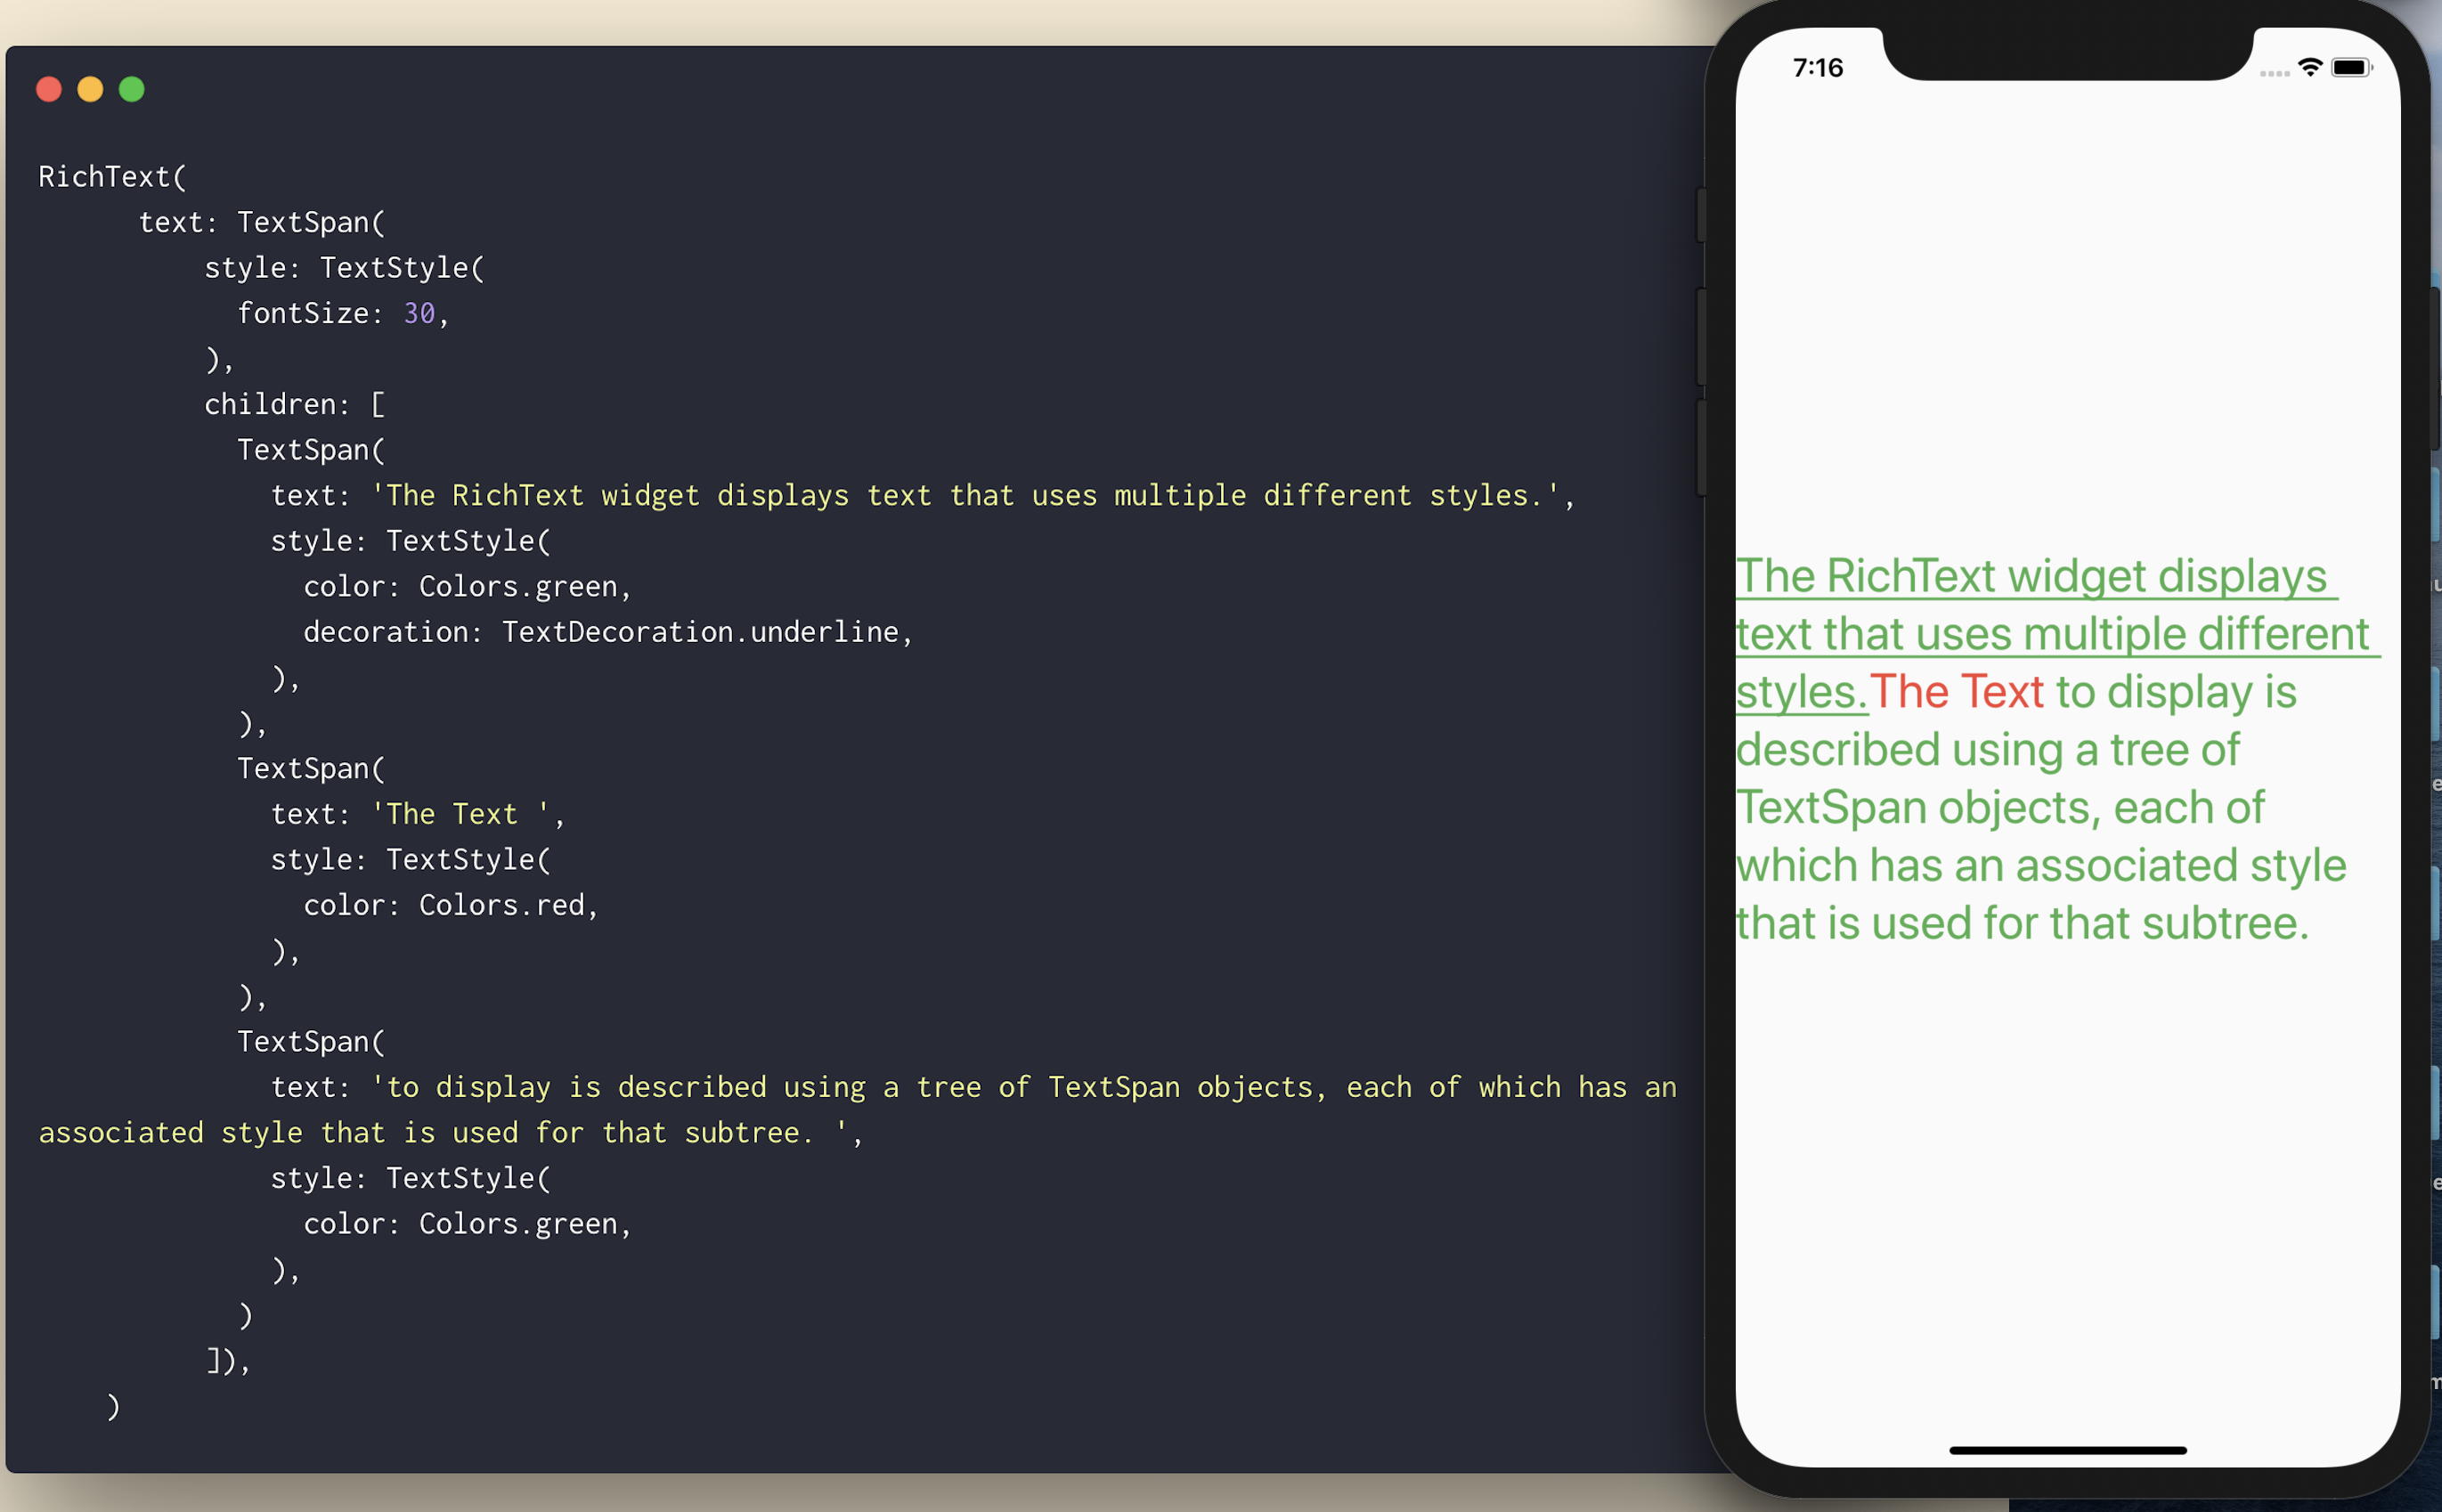
提示 6:RichText Widget
如果您想在单个文本中拥有不同样式的文本?不要费心或尝试使用Text()进行 hack,而是使用带有TextSpan()的RichText()。
提示 7:Spacer Widget
使用带有特定高度/宽度的 Container 在 Widgets 之间创建响应式间距?它在一屏上可能看起来不错,但在不同屏幕尺寸下不会看起来一样。
Spacer Widget 来拯救您。使用Spacer(flex: )代替Container(width: / height: )。
我怎么会不知道这个 Widget 呢?这会拯救很多生命?
提示 8:ListView.separated()
如果您像我一样,一直在 ListItem 的底部添加带有maxwidth的Container()来放置分隔线,那么您一直以来都做错了。
Flutter 有ListView.separated,正是为此目的。除了在使用ListView.builder时已经传递的参数外,我们还需要提供separatorBuilder。
奖励????:您不必检查项目是否是最后一个,以免在最后一个项目之后绘制分隔线。
ListView.separated(
  itemCount: 25,
  separatorBuilder: (BuildContext context, int index) => Divider(
    thickness: 1,
  ),
  itemBuilder: (BuildContext context, int index) {
    return ListTile(
      title: Text(
        'Index Number $index',
      ),
    );
  },
);
提示 9:将函数作为参数传递
我们可以像传递变量一样,简单地将一个函数作为参数传递。当我们在调用函数时想调用传递的函数,我们只需在其后加上(),如果它接受参数,则一并传递。
void main() {
  f2(f1, 3);
  f2(f1, 4);
  f2(f1, 7);
}

f1(int venOrOdd) {
  print("$evenOrOdd is ${evenOrOdd % 2 == 0 ? "Even" : "Odd"}");
}

f2(Function(int) evenOrOddFunction, int argumentToPass) {
  evenOrOddFunction(argumentToPass);
}
输出
3 is Odd
4 is Even
7 is Odd
提示 10:相对导入:导入我们 lib 包中.dart文件的正确方法
是否曾想过导入自己包中文件的正确方法?
优先使用相对导入而非绝对导入。
为什么?
- 它更短、更简洁。
- 我们可以轻松地区分我们的文件和第三方文件。
- 这很合理,不是吗?
my_package
└─ lib
   ├─ src
   │  └─ utils.dart
   └─ api.dart
如果api.dart想导入utils.dart,它应该这样做:
import 'src/utils.dart';
而不是
import 'package:my_package/src/utils.dart';
提示 11:重用文本样式
厌倦了每次要自定义Text时都要定义textStyle?更糟糕的是,如果您有多个主题(深色、浅色、全黑主题等)。
只需使用
Theme.of(context).textTheme.title
其中textTheme中还有其他样式,如title。
Text(
  "Title",
  style: Theme.of(context).textTheme.title,
)
提示 12:使用字面量初始化可增长集合
如果我们初始化可增长集合,请使用字面量初始化而不是构造函数。
// Good
var points = [];
var addresses = {};

// Bad
var points = List();
var addresses = Map();

// With type argument

// Good
var points = <Point>[];
var addresses = <String, Address>{};

// Bad
var points = List<Point>();
var addresses = Map<String, Address>();
提示 13:箭头函数
我们可以在 dart 中使用箭头=>成员(函数、getter、setter)。
如果声明不是单行,我不会使用=>。但几行是可以接受的。
void main() {
  User()
    ..firstName = "Laxman"
    ..lastName = " Bhattarai"
    ..age = 18
    ..printUser();
}

class User {
  String firstName;
  String lastName;
  DateTime birthday;

  String get fullName => firstName + lastName;

  set age(int age) =>  birthday = DateTime.now().subtract(Duration(days: age * 365));

  int get age => DateTime.now().year - birthday.year;

  bool get isAdult => age >= 18;

  printUser() => print(fullName + " is a ${isAdult ? "Adult" : "Child"}");
}
提示 14:FractionallySizedBox
是否曾想过让 Widget 的高度和宽度与其屏幕的高度和宽度完全成比例?
FractionallySizedBox 正是为了这种用例而构建的。只需为您需要的高度和宽度指定分数,它就会处理所有其他事情。分数的值将在 0.0 到 1.0 之间。
FractionallySizedBox(
  widthFactor: 0.5,
  heightFactor: 0.5,
  child: Container(color: Colors.green),
)

提示 15:Flexible vs Expanded
Expanded() 只是 Flexible() 的一个
Flexible (fit: FlexFit.tight) = Expanded()
但是,Flexible 默认使用fit :FlexFit.loose。
FlexFit.tight = 想要紧密地适应父级,尽可能多地占用空间。
FlexFit.loose = 想要松散地适应父级,为自己占用尽可能少的空间。
flex = 从父级获取的空间的比例。如果使用flex: FlexFit.loose(即Flexible),则通常不完全使用。

如果您仔细阅读以下图片,您将完全理解Flexible和Expanded之间的区别。
class Flexible extends... {
  /// The flex factor to use for this child
  ///
  /// If null or zero, the child is inflexible and determines its own size. If
  /// non-zero, the amount of space the child's can occupy in the main axis is
  /// determined by dividing the free space (after placing the inflexible
  /// children) according to the flex factors of the flexible children.
  final int flex;

  /// How a flexible child is inscribed into the available space.
  ///
  /// If [flex] is non-zero, the [fit] determines whether the child fills the
  /// space the parent makes available during layout. If the fit is
  /// [FlexFit.tight], the child is required to fill the available space. If the
  /// fit is [FlexFit.loose], the child can be at most as large as the available
  /// space (but is allowed to be smaller).
  final FlexFit fit;

  ........
}

class Expanded extends Flexible {
  /// Creates a widget that expands a child of a [Row], [Column], or [Flex]
  /// so that the child fills the available space along the flex widget's
  /// main axis.
  const Expanded({
    Key key,
    int flex = 1,
    @required Widget child,
  }) : super(key: key, flex: flex, fit: FlexFit.tight, child: child);
}
提示 16:批量声明
如果您一直单独声明每个成员,那么您可以一次声明相同类型的成员。
我不会一次声明age和shoeSize,因为它们不相关。
能力越大,责任越大,请明智地使用。
class Footballer {

  String firstName = "Lionel";
  String middleName = "Andrés";
  String lastName = "Messi";

  double weightKG;
  double heightCM;

  int goals;
  int assists;
  int tackles;
  int takeons;
  int saves;
  int shots;
}

// The class above can be replaced with:
class Footballer {

  String firstName = "Lionel", middleName = "Andrés", lastName = "Messi";

  double weightKG, heightCM;

  int goals, assists, tackles, takeons, saves, shots;
}
提示 17:SliverAppBar / 可折叠 AppBar / 视差标题
还记得 CollapsableAppBar (android) / ParallaxHeader (ios) 吗?Flutter 中有 SliverAppBar 可以做到这一点。
要使用它,您需要有一个 CustomScrollView 作为父级。
然后您添加两个 sliver。
- SliverAppBar
- SliverFillRemaining
您可以调整 snap、floating、pinned 等的值以获得所需的效果。
提示 18:Key 是什么

是否想过我们为什么需要 GlobalKey(子项:GlobalObjectKey、LabeledGlobalKey)、LocalKey(子项:ObjectKey、ValueKey & UniqueKey)?
它们用于在有状态的 Widget 中访问或恢复状态(如果我们的 Widget 树全是无状态 Widget,我们通常不需要它们)。
目的(括号内使用的 Key)
- 在有状态 Widget 中突变集合,即从列表中删除/添加/重新排序项目,例如可拖动的待办事项列表,已勾选的项目会被删除(ObjectKey、ValueKey & UniqueKey)。
- 将 Widget 从一个父级移动到另一个父级,同时保留其状态。(GlobalKey)。
- 在多个屏幕上显示相同的 Widget 并保持其状态。(GlobalKey)。
- 验证表单。(GlobalKey)。
- 您可以在不使用任何数据的情况下提供 Key。(UniqueKey)。
- 如果您可以使用用户 UUID 等特定数据字段作为唯一 Key。(ValueKey)。
- 如果您没有可用的唯一字段作为 Key,但对象本身是唯一的。(ObjectKey)。
- 如果您有多个表单或相同类型的多个 Widget 需要 GlobalKey。(GlobalObjectKey、LabeledGlobalKey,取决于哪种合适,逻辑与 ValueKey 和 ObjectKey 类似)。
提示 19:强大的库time.dart
如果您厌倦了冗长且啰嗦的 DateTime 和 Duration 计算,time.dart可以为您排忧解难。
//Before
var 3dayLater = DateTime.now().add(Duration(days: 3)).day;

//After
var 3dayLater = 3.days.fromNow.day;

//Before
var duration = Duration(minutes: 10) +Duration(seconds: 15)
  - Duration(minutes: 3) + Duration(hours: 2;

//After
var duration = 10.minutes + 15.seconds - 3.minutes + 2.hours;

//Before
await  Future.delayed(Duration(seconds: 2))

//After
await 2.seconds.delay
提示 20:测试错误
您可以使用expect(actual, expected)在 dart 中简单地测试两个值是否相等。
但如果您想测试错误,请使用抛出错误的函数闭包作为实际值,并使用throwsA<ErrorType>作为预期值进行检查。
void main() {
  group("Exception/Error testing", () {
    test("test method that throws errors", () {
      expect(_testError(fails: false), false);
      expect(() => _testError(fails: true), throwsA(isA<FooError>()));
    });
  });
}

bool _testError({bool fails}) {
  if(fails)throw FooError();
    return fails;
}

class FooError extends Error {}


