
Flutter 应用支持 CarPlay?

Flutter 应用现在支持 Apple CarPlay!flutter_carplay 旨在通过集成 CarPlay,让用户可以在车内安全地使用 Flutter 构建的 iPhone 应用。CarPlay 将您在驾驶时想要进行的操作呈现在汽车的内置显示屏上。
Apple 在 iOS 14 中公布了一些很棒的功能,其中一项是用户可以从 App Store 下载 CarPlay 应用,并在 iPhone 上像其他应用一样使用它们。当连接到 CarPlay 汽车的 iPhone 上有 CarPlay 应用时,应用的图标会出现在 CarPlay 的主屏幕上。CarPlay 应用并不是独立的应用程序,而是您将 CarPlay 支持添加到现有应用中。
您的应用使用 CarPlay 框架向用户展示 UI 元素。iOS 会管理 UI 元素的显示,并处理与汽车的交互。您的应用无需管理不同屏幕分辨率的 UI 元素布局,也无需支持不同的输入硬件,如触摸屏、旋钮或触摸板。
它**仅支持 iOS 14.0+**。有关通用设计指南,请参阅 CarPlay 应用的人机界面指南。
概述

在开始 CarPlay 集成之前,您必须仔细阅读本节。
Apple 的官方应用编程指南 是理解 CarPlay 应用的需求、限制和功能的最有价值的资源。本指南有 49 页,清晰地阐述了所需的一些操作,强烈建议您阅读。如果您对 CarPlay 系统感兴趣,请了解更多有关 MFi Program 的信息。
模板
CarPlay 应用由一组固定的用户界面模板构建,iOS 会在 CarPlay 屏幕上渲染这些模板。每个 CarPlay 应用类别只能使用有限数量的模板。您的应用授权决定了您对模板的访问权限。 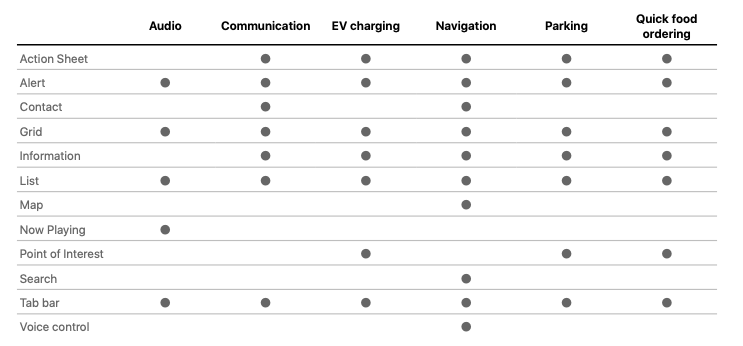
支持
flutter_carplay 目前支持
- 操作表模板
- 警报模板
- 网格模板
- 列表模板
- 标签栏模板
通过评估这些信息,您可以向 Apple 申请相关的授权。
路线图
由于我没有一些必需的授权,flutter_carplay 将在未来的版本中支持其他模板。
- 地图
- Search
- 语音控制和“嘿 Siri”用于免提语音激活
- 信息
- 联系方式
- 兴趣点
- 正在播放
贡献
- Pull Requests 始终受到欢迎。
- Pull Request 审查更受欢迎!我需要测试方面的帮助。
- 如果您有兴趣更积极地贡献,请通过 [email protected] 与我联系。谢谢!
- 如果您想在编码方面提供帮助,请加入 Slack Channel,我们可以在那里交流。
申请 CarPlay 授权
所有 CarPlay 应用都需要 CarPlay 应用授权。
如果您想在 Apple 上构建、运行和发布兼容 CarPlay 的应用,或者通过 TestfFlight 或 AdHoc 测试或与他人分享应用,您必须首先请求 Apple 批准您的开发者账户以访问 CarPlay。此过程可能需要几天到几周甚至几个月。这取决于您申请的授权类型。
要从 Apple 申请 CarPlay 应用授权,请访问 https://developer.apple.com/contact/carplay 并提供有关您应用的信息,包括 CarPlay 应用类别。您还必须同意 CarPlay 授权附录。
通过此项目,您可以在等待 CarPlay 授权的同时,开始通过 Apple 的 CarPlay 模拟器进行开发和测试。Apple 将审核您的请求。如果您的应用符合 CarPlay 应用的标准,Apple 将为您的 Apple Developer Account 分配 CarPlay 应用授权并通知您。
无论您是通过模拟器运行应用还是将其用于分发,都必须确保将相关的授权密钥添加到 Entitlements.plist 文件中。如果尚不存在,则必须创建一个 Entitlements.plist 文件。
收到 CarPlay 授权后
收到授权后,您需要配置您的 Xcode 项目以使用它,这涉及几个步骤。您需要创建并导入配置描述文件,并添加 Entitlements.plist 文件。您项目的代码签名设置也需要进行一些小的更改。
有关如何创建和导入 CarPlay 配置描述文件以及将 Entitlements 文件添加到 Xcode 项目的更详细说明,请访问 使用 CarPlay 所需的授权配置您的 CarPlay 应用。
安装前的免责声明
安装此软件包后,您将对 Xcode 项目进行一些小的更改。这是因为该包需要 bitcode 编译,而 Flutter 中缺少此功能。您将执行一项操作,该操作将重新定位(我们不会删除或编辑)一些 Flutter 及其软件包引擎。如果您计划将此软件包添加到对您很重要的项目中,您应该谨慎进行。
在开始安装之前,请先查看 示例项目。
安装步骤可能很困难,或者可能与您当前项目中与 Flutter 引擎通信的某些软件包无法正常工作。如果您不完全确定自己在做什么,请创建一个 issue,以便我帮助您解决问题或解释您需要什么。
在安装过程中,如果您尝试更改任何内容(例如,任何与 Flutter 引擎一起工作的代码、生成插件注册表中的任何内容,特别是其位置、任何文件名、任何类名,或在 AppDelegate 类、模板或 Info.plist 中使用的窗口应用程序委托场景名称、包含的 Storyboard 名称,但不限于这些),您很可能会遇到不可逆转的错误,并可能损坏您的项目。我强烈建议您在安装前备份现有项目。
开始使用
安装软件包后的必要操作
- iOS 平台版本必须设置为 14.0。要全局设置,请导航到
ios/Podfile并复制前两行。
# Uncomment this line to define a global platform for your project
+ platform :ios, '14.0'
- # platform :ios, '9.0'
更改平台版本后,在终端中执行以下命令以更新您的 pod 文件。
// For Apple Silicon M1 chips:
$ cd ios && arch -x86_64 pod install --repo-update

// For Intel chips:
$ cd ios && pod install --repo-update
-
在 Xcode 中打开
ios/Runner.xcworkspace。在项目导航器中,打开AppDelegate.swift。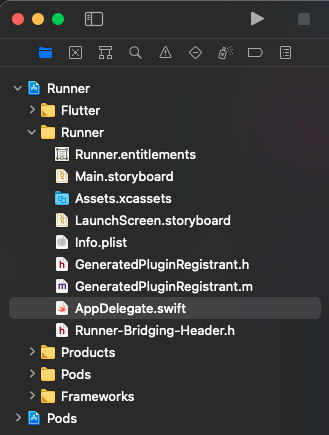
从
AppDelegate.swift中的 application 函数中删除指定的代码,并用以下代码替换:
import UIKit
import Flutter

@UIApplicationMain
@objc class AppDelegate: FlutterAppDelegate {
override func application( _ application: UIApplication,
                        didFinishLaunchingWithOptions launchOptions: [UIApplication.LaunchOptionsKey: Any]?) -> Bool {
-   GeneratedPluginRegistrant.register(with: self)
-   return super.application(application, didFinishLaunchingWithOptions: launchOptions)
+   return true
}
}
-
在 Runner 文件夹中(而不是 Xcode 主项目文件中)创建一个名为
SceneDelegate.swift的 Swift 文件,并添加以下代码。@available(iOS 13.0, *) class SceneDelegate: UIResponder, UIWindowSceneDelegate { var window: UIWindow? func scene(_ scene: UIScene, willConnectTo session: UISceneSession, options connectionOptions: UIScene.ConnectionOptions) { guard let windowScene = scene as? UIWindowScene else { return } window = UIWindow(windowScene: windowScene) let flutterEngine = FlutterEngine(name: "SceneDelegateEngine") flutterEngine.run() GeneratedPluginRegistrant.register(with: flutterEngine) let controller = FlutterViewController.init(engine: flutterEngine, nibName: nil, bundle: nil) window?.rootViewController = controller window?.makeKeyAndVisible() } }

-
还有一步,在您喜欢的代码编辑器或 Xcode 中打开
Info.plist文件。我将分享基本代码,因此如果您在 Xcode 中打开它,可以使用原始键值对填写。<key>UIApplicationSceneManifest</key> <dict> <key>UIApplicationSupportsMultipleScenes</key> <true /> <key>UISceneConfigurations</key> <dict> <key>CPTemplateApplicationSceneSessionRoleApplication</key> <array> <dict> <key>UISceneConfigurationName</key> <string>CarPlay Configuration</string> <key>UISceneDelegateClassName</key> <string>flutter_carplay.FlutterCarPlaySceneDelegate</string> </dict> </array> <key>UIWindowSceneSessionRoleApplication</key> <array> <dict> <key>UISceneConfigurationName</key> <string>Default Configuration</string> <key>UISceneDelegateClassName</key> <string>$(PRODUCT_MODULE_NAME).SceneDelegate</string> <key>UISceneStoryboardFile</key> <string>Main</string> </dict> </array> </dict> </dict>
就是这样,您已准备好构建您的第一个 CarPlay 应用!🥳 🎉
用法和功能
基本用法
- 从一个文件中导入所有您需要的类。
import 'package:flutter_carplay/flutter_carplay.dart';
- 初始化 CarPlay Controllers 并为 CarPlay 视图层级设置根模板。
final FlutterCarplay _flutterCarplay = FlutterCarplay();

FlutterCarplay.setRootTemplate(
  rootTemplate: CPTabBarTemplate(
    templates: [
      CPListTemplate(
        sections: [
          CPListSection(
            items: [
              CPListItem(
                text: "Item 1",
                detailText: "Detail Text",
                onPress: (complete, self) {
                  self.setDetailText("You can change the detail text.. ?");
                  Future.delayed(const Duration(seconds: 1), () {
                    self.setDetailText("Customizable Detail Text");
                    complete();
                  });
                },
              ),
            ],
            header: "First Section",
          ),
        ],
        title: "Home",
        showsTabBadge: false,
        systemIcon: "house.fill",
      ),
    ],
  ),
  animated: true,
);
您可以在不初始化 CarPlay Controllers 的情况下设置根模板,但某些回调函数可能无法正常工作,或者更有可能收到错误。
建议在应用首次 initState 中设置根模板。
监听连接状态更改
您可以检测连接状态的变化,例如 CarPlay 连接到 iPhone、处于后台或完全断开连接。
/// Add the listener
_flutterCarplay.addListenerOnConnectionChange(onCarplayConnectionChange);

void onCarplayConnectionChange(CPConnectionStatusTypes status) {
  // Do things when carplay connection status is:
  // - CPConnectionStatusTypes.connected
  // - CPConnectionStatusTypes.background
  // - CPConnectionStatusTypes.disconnected
  // - CPConnectionStatusTypes.unknown
}

/// Remove the listener
_flutterCarplay.removeListenerOnConnectionChange();
CarPlay API 方法
CarPlay.setRootTemplate
设置导航层级的根模板。如果导航层级已存在,CarPlay 将替换整个层级。
- rootTemplate 是用作新导航层级根的模板。如果已存在,它将替换当前的 rootTemplate。**必须是以下类型之一:** **CPTabBarTemplate**、**CPGridTemplate**、**CPListTemplate**。否则,将抛出 **TypeError**。
- 如果 animated 为 true,CarPlay 会动画化模板的呈现,但在没有现有导航层级可替换时,此标志将被忽略。
CarPlay 在一个屏幕上不能有超过 5 个模板。
FlutterCarplay.setRootTemplate(
  rootTemplate: /* CPTabBarTemplate, CPGridTemplate or CPListTemplate */,
  animated: true,
);
CarPlay.push
将模板添加到导航层级并显示它。
- template 是要添加到导航层级的。**必须是以下类型之一:** **CPGridTemplate**、**CPListTemplate**。否则,将抛出 **TypeError**。
- 如果 animated 为 true,CarPlay 会动画化模板之间的过渡。
可以推送到屏幕的模板数量是有限制的。所有应用最多只能推送 5 层深度,包括根模板。
FlutterCarplay.push(
  template: /* CPGridTemplate or CPListTemplate */,
  animated: true,
);
CarPlay.pop
从导航层级中移除最顶层的模板。
- 如果 animated 为 true,CarPlay 会动画化模板之间的过渡。
- count 表示该函数将执行多少次。
FlutterCarplay.pop();
// OR
FlutterCarplay.pop(animated: true, count: 1);
CarPlay.popToRoot
从导航层级中移除除根模板以外的所有模板。
- 如果 animated 为 true,CarPlay 会动画化模板的呈现。
FlutterCarplay.popToRoot(animated: true);
CarPlay.popModal
移除模态模板。由于 **CPAlertTemplate** 和 **CPActionSheetTemplate** 都是模态的,因此它们都可以被移除。
- 如果 animated 为 true,CarPlay 会动画化模板之间的过渡。
FlutterCarplay.popModal(animated: true);
CarPlay.connectionStatus
当前 CarPlay 连接状态的 getter。它将返回 **CPConnectionStatusTypes** 的一个字符串。
FlutterCarplay.connectionStatus
模板
CarPlay 支持通用模板,如警报、列表和标签栏。它们用于从应用在 CarPlay 屏幕上显示内容。 开发者指南 包含有关 Apple 支持的模板的更多信息。
如果您尝试使用您的授权不支持的模板,将在运行时发生异常。
标签栏模板
标签栏是其他模板的多用途容器,每个模板占据标签栏中的一个标签。
final CPTabBarTemplate tabBarTemplate = CPTabBarTemplate(
  templates: [
    CPListTemplate(
      sections: [
        CPListSection(
          items: [
            CPListItem(
              text: "Item 1",
              detailText: "Detail Text",
              onPress: (complete, self) {
                // Returns the self class so that the item
                // can be updated within self while loading
                self.setDetailText("You can change the detail text.. ?");
                // complete function stops the loading
                complete();
              },
              image: 'images/logo_flutter_1080px_clr.png',
            ),
            CPListItem(
              text: "Item 2",
              detailText: "Start progress bar",
              isPlaying: false,
              playbackProgress: 0,
              // asset name defined in pubspec.yaml
              image: 'images/logo_flutter_1080px_clr.png',
              onPress: (complete, self) {
                complete();
              },
            ),
          ],
          header: "First Section",
        ),
      ],
      title: "Home",
      showsTabBadge: false,
      systemIcon: "house.fill",
    ),
    CPListTemplate(
      sections: [],
      title: "Settings",
      // If there is no section in the list template,
      // empty view title and subtitle variants will be shown
      emptyViewTitleVariants: ["Settings"],
      emptyViewSubtitleVariants: [
        "No settings have been added here yet. You can start adding right away"
      ],
      showsTabBadge: false,
      systemIcon: "gear",
    ),
  ],
);

FlutterCarplay.setRootTemplate(rootTemplate: tabBarTemplate, animated: true);
网格模板
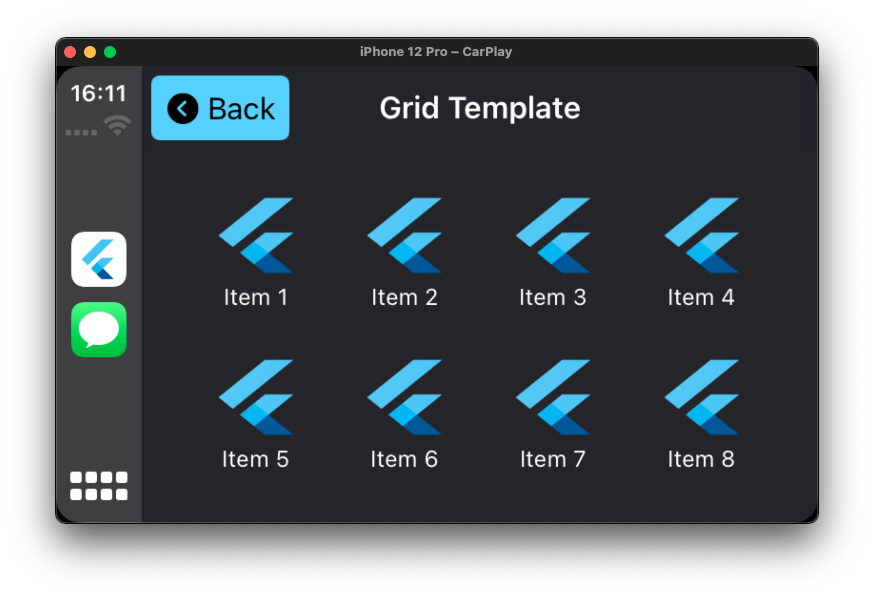
网格模板是一种特定的菜单样式,它呈现多达 8 个由图像和标题表示的项目。使用网格模板让用户从固定的类别列表中进行选择。
final CPGridTemplate gridTemplate = CPGridTemplate(
  title: "Grid Template",
  buttons: [
    for (var i = 1; i < 9; i++)
      CPGridButton(
        titleVariants: ["Item $i"],
        image: 'images/logo_flutter_1080px_clr.png',
        onPress: () {
          print("Grid Button $i pressed");
        },
      ),
  ],
);

FlutterCarplay.push(template: gridTemplate, animated: true);
// OR
FlutterCarplay.setRootTemplate(rootTemplate: gridTemplate, animated: true);
警报模板
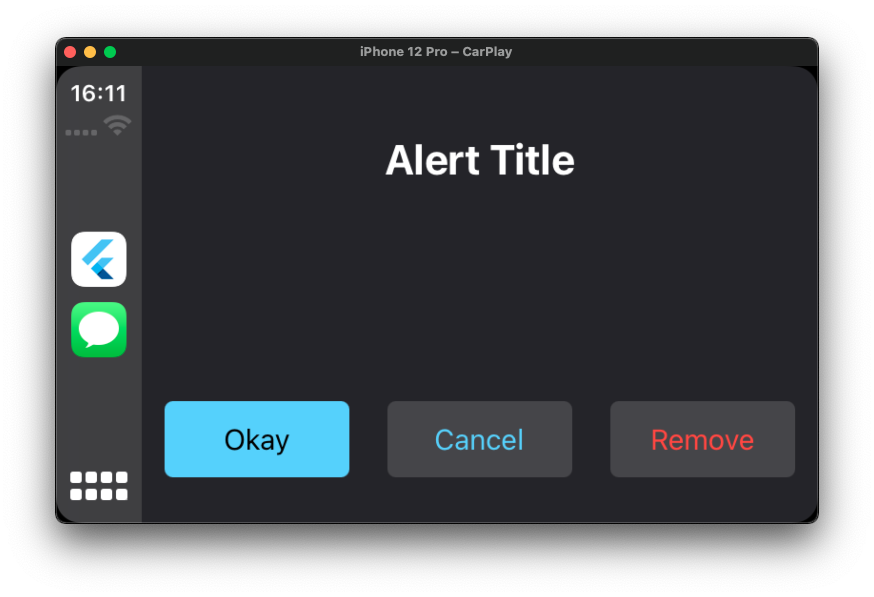
警报提供有关您应用状态的重要信息。警报由一个标题和一个或多个按钮组成,具体取决于类型。
如果底层条件允许,警报可以被程序化地关闭。
final CPAlertTemplate alertTemplate = CPAlertTemplate(
  titleVariants: ["Alert Title"],
  actions: [
    CPAlertAction(
      title: "Okay",
      style: CPAlertActionStyles.normal,
      onPress: () {
        print("Okay pressed");
        FlutterCarplay.popModal(animated: true);
      },
    ),
    CPAlertAction(
      title: "Cancel",
      style: CPAlertActionStyles.cancel,
      onPress: () {
        print("Cancel pressed");
        FlutterCarplay.popModal(animated: true);
      },
    ),
    CPAlertAction(
      title: "Remove",
      style: CPAlertActionStyles.destructive,
      onPress: () {
        print("Remove pressed");
        FlutterCarplay.popModal(animated: true);
      },
    ),
  ],
),

FlutterCarplay.showAlert(template: alertTemplate, animated: true);
操作表模板
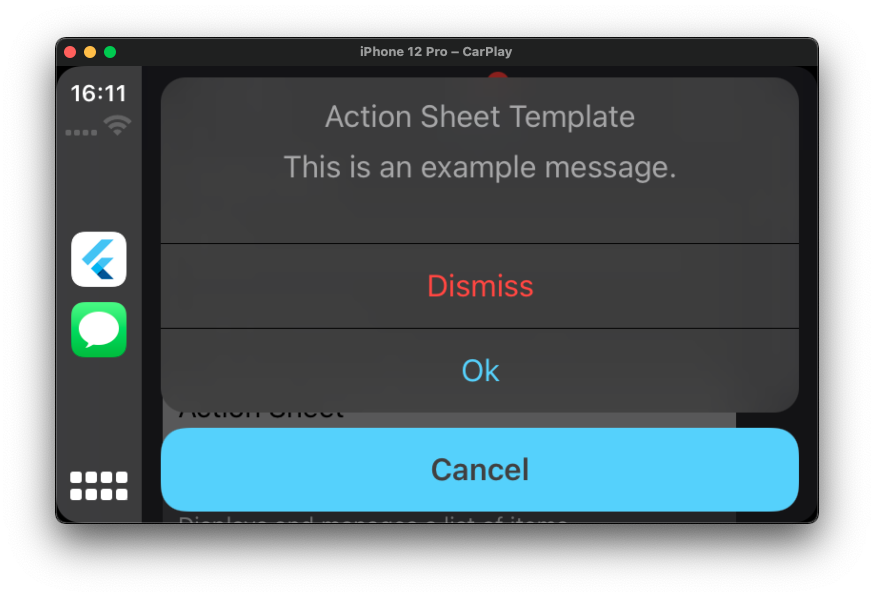
操作表模板是一种警报,当采取控制或操作时出现,并根据当前上下文提供一组选项。
使用操作表让用户启动任务,或在执行可能具有破坏性的操作之前请求确认。
final CPActionSheetTemplate actionSheetTemplate = CPActionSheetTemplate(
  title: "Action Sheet Template",
  message: "This is an example message.",
  actions: [
    CPAlertAction(
      title: "Cancel",
      style: CPAlertActionStyles.cancel,
      onPress: () {
        print("Cancel pressed in action sheet");
        FlutterCarplay.popModal(animated: true);
      },
    ),
    CPAlertAction(
      title: "Dismiss",
      style: CPAlertActionStyles.destructive,
      onPress: () {
        print("Dismiss pressed in action sheet");
        FlutterCarplay.popModal(animated: true);
      },
    ),
    CPAlertAction(
      title: "Ok",
      style: CPAlertActionStyles.normal,
      onPress: () {
        print("Ok pressed in action sheet");
        FlutterCarplay.popModal(animated: true);
      },
    ),
  ],
);

FlutterCarplay.showActionSheet(template: actionSheetTemplate, animated: true);
列表模板

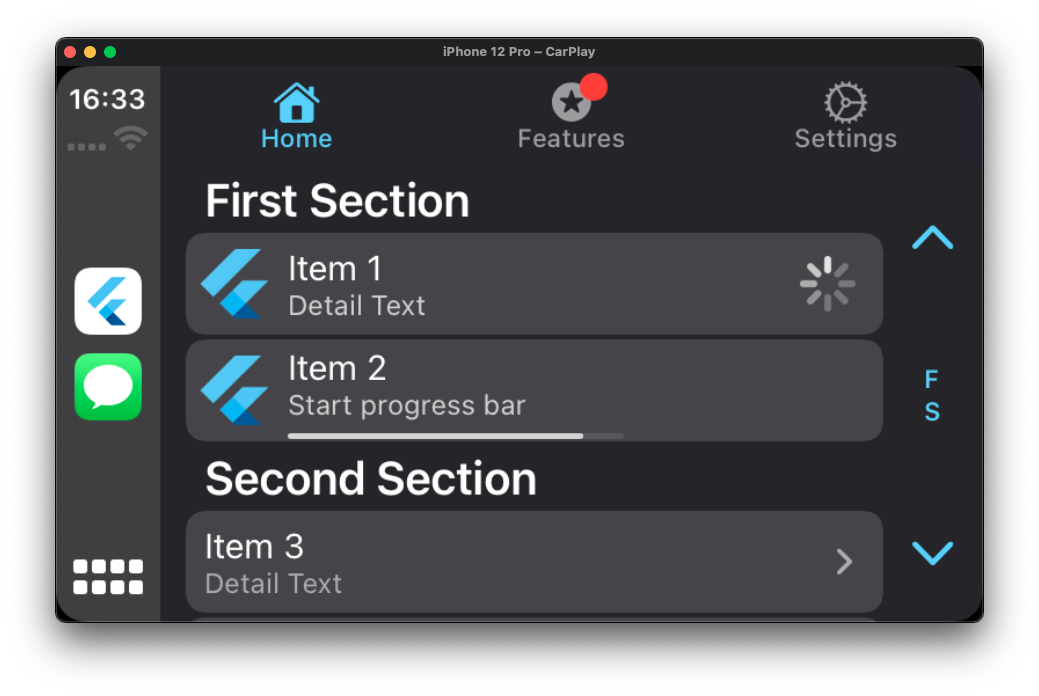
列表将数据呈现为可分为多个部分的、滚动的单列表格。列表非常适合基于文本的内容,并且可以用作分层信息的导航手段。列表中的每个项目都可以包含属性,例如图标、标题、副标题、披露指示器、进度指示器、播放状态或阅读状态。
某些汽车会将列表动态限制为最多 12 个项目。您始终需要准备好处理只能显示 12 个项目的情况。超出最大数量的项目将不会显示。
final CPListTemplate listTemplate = CPListTemplate(
  sections: [
    CPListSection(
      items: [
        CPListItem(
          text: "Item 1",
          detailText: "Detail Text",
          onPress: (complete, self) {
            // Returns the self class so that the item
            // can be updated within self while loading
            self.setDetailText("You can change the detail text.. ?");
            // complete function stops the loading
            complete();
          },
          image: 'images/logo_flutter_1080px_clr.png',
        ),
        CPListItem(
          text: "Item 2",
          detailText: "Start progress bar",
          isPlaying: false,
          playbackProgress: 0,
          // asset name defined in pubspec.yaml
          image: 'images/logo_flutter_1080px_clr.png',
          onPress: (complete, self) {
            complete();
          },
        ),
      ],
      header: "First Section",
    ),
  ],
  title: "Home",
  showsTabBadge: false,
  systemIcon: "house.fill",
  // If there is no section in the list template,
  // empty view title and subtitle variants will be shown
  emptyViewTitleVariants: ["Home"],
  emptyViewSubtitleVariants: [
    "Nothing has added here yet. You can start adding right away"
  ],
);

FlutterCarplay.push(template: listTemplate, animated: true);
// OR
FlutterCarplay.setRootTemplate(rootTemplate: listTemplate, animated: true);
许可
版权 (c) 2021 Oğuzhan Atalay
兹授予任何人获取本软件及相关文档文件(“软件”)副本的权利,允许其在软件中进行交易,不受限制,包括但不限于使用、复制、修改、合并、发布、分发、再许可和/或出售软件副本的权利,并允许向其提供软件的人员这样做,但须满足以下条件:
以上版权声明和本许可声明应包含在软件的所有副本或实质性部分中。
软件按“原样”提供,不提供任何形式的保证,无论是明示的还是暗示的,包括但不限于适销性、特定用途的适用性和非侵权性保证。在任何情况下,作者或版权所有者均不对因软件或在软件中的使用或其他交易而引起的任何索赔、损害或其他责任负责,无论是合同、侵权行为还是其他方面的诉讼。


