
![]()

Binder
![]()
一种轻量级但功能强大的方式,可将您的应用程序状态与业务逻辑绑定。
愿景
与其他状态管理模式一样,Binder 旨在将应用程序状态与更新它的业务逻辑分离开来
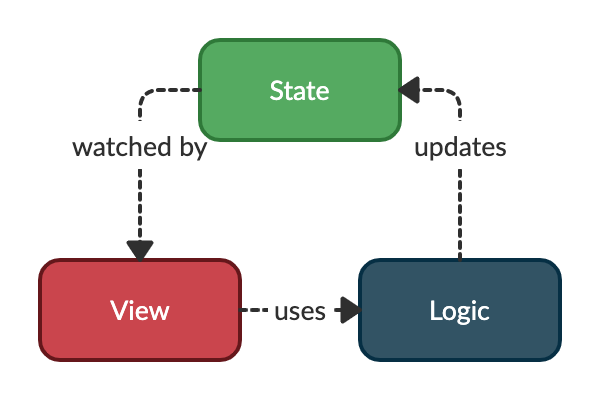
我们可以将整个应用程序状态视为许多微小状态的聚合。每个状态都是独立的。
视图可以对某些特定状态感兴趣,并必须使用逻辑组件来更新它们。
入门
安装
在您的 flutter 项目的 pubspec.yaml 文件中,添加以下依赖项
dependencies:
  binder: <latest_version>
在您的库中添加以下导入
import 'package:binder/binder.dart';
基本用法
任何状态都必须通过 StateRef 及其初始值来声明
final counterRef = StateRef(0);
注意:状态应该是不可变的,因此更新它的唯一方法是通过此包提供的函数。
任何逻辑组件都必须通过 LogicRef 及其用于创建它的函数来声明
final counterViewLogicRef = LogicRef((scope) => CounterViewLogic(scope));
然后,逻辑可以使用 scope 参数来修改状态并访问其他逻辑组件。
注意:如果您希望 StateRef 和 LogicRef 对象可从您应用的其余部分访问,您可以将它们声明为公共全局变量。
如果我们希望我们的 CounterViewLogic 能够增加我们的计数器状态,我们可能会这样写
/// A business logic component can apply the [Logic] mixin to have access to
/// useful methods, such as `write` and `read`.
class CounterViewLogic with Logic {
  const CounterViewLogic(this.scope);

  /// This is the object which is able to interact with other components.
  @override
  final Scope scope;

  /// We can use the [write] method to mutate the state referenced by a
  /// [StateRef] and [read] to obtain its current state.
  void increment() => write(counterRef, read(counterRef) + 1);
}
为了在 Flutter 应用中将所有这些绑定在一起,我们必须使用一个名为 BinderScope 的专用小部件。
此小部件负责保存应用程序状态的一部分,并提供逻辑组件。
您通常会在 MaterialApp 小部件的上方创建此小部件
BinderScope(
  child: MaterialApp(
    home: CounterView(),
  ),
);
在 BinderScope 下的任何小部件中,您都可以调用 BuildContext 上的扩展方法,将视图绑定到应用程序状态和业务逻辑组件
class CounterView extends StatelessWidget {
  const CounterView({Key? key}) : super(key: key);

  @override
  Widget build(BuildContext context) {
    /// We call the [watch] extension method on a [StateRef] to rebuild the
    /// widget when the underlaying state changes.
    final counter = context.watch(counterRef);

    return Scaffold(
      appBar: AppBar(title: const Text('Binder example')),
      body: Center(
        child: Column(
          mainAxisAlignment: MainAxisAlignment.center,
          children: <Widget>[
            const Text('You have pushed the button this many times:'),
            Text('$counter', style: Theme.of(context).textTheme.headline4),
          ],
        ),
      ),
      floatingActionButton: FloatingActionButton(
        /// We call the [use] extension method to get a business logic component
        /// and call the appropriate method.
        onPressed: () => context.use(counterViewLogicRef).increment(),
        tooltip: 'Increment',
        child: const Icon(Icons.add),
      ),
    );
  }
}
这就是您对基本用法所需了解的一切。
注意:上面代码片段的全部代码可在 example 文件中找到。
中级用法
Select
状态可以是简单的类型,如 int 或 String,也可以是更复杂的类型,如下所示
class User {
  const User(this.firstName, this.lastName, this.score);

  final String firstName;
  final String lastName;
  final int score;
}
应用程序的某些视图只对全局状态的某些部分感兴趣。在这些情况下,仅选择对这些视图有用的状态部分可能更有效。
例如,如果我们有一个应用栏标题,它只负责显示 User 的全名,并且我们不希望它在每次分数更改时都重建,我们将使用 StateRef 的 select 方法仅监视状态的子部分
class AppBarTitle extends StatelessWidget {
  const AppBarTitle({Key? key}) : super(key: key);

  @override
  Widget build(BuildContext context) {
    final fullName = context.watch(
      userRef.select((user) => '${user.firstName} ${user.lastName}'),
    );
    return Text(fullName);
  }
}
Consumer
如果您只想重建您的 widget 树的一部分,而不想创建新的 widget,可以使用 Consumer widget。
此 widget 可以接受一个可观察对象(StateRef 甚至是 StateRef 的选定状态)。
class MyAppBar extends StatelessWidget {
  const MyAppBar({Key? key}) : super(key: key);

  @override
  Widget build(BuildContext context) {
    return AppBar(
      title: Consumer(
        watchable:
            userRef.select((user) => '${user.firstName} ${user.lastName}'),
        builder: (context, String fullName, child) => Text(fullName),
      ),
    );
  }
}
LogicLoader
如果您想从 widget 端触发逻辑的异步数据加载,LogicLoader 是您需要的 widget!
要使用它,您必须在需要加载数据的逻辑中实现 Loadable 接口。
然后您必须覆盖 load 方法并在其中获取数据。
final usersRef = StateRef(const <User>[]);
final loadingRef = StateRef(false);

final usersLogicRef = LogicRef((scope) => UsersLogic(scope));

class UsersLogic with Logic implements Loadable {
  const UsersLogic(this.scope);

  @override
  final Scope scope;

  UsersRepository get _usersRepository => use(usersRepositoryRef);

  @override
  Future<void> load() async {
    write(loadingRef, true);
    final users = await _usersRepository.fetchAll();
    write(usersRef, users);
    write(loadingRef, false);
  }
}
从 widget 端,您将需要使用 LogicLoader 并提供您想要加载的逻辑引用
class Home extends StatelessWidget {
  const Home({
    Key? key,
  }) : super(key: key);

  @override
  Widget build(BuildContext context) {
    return LogicLoader(
      refs: [usersLogicRef],
      child: const UsersView(),
    );
  }
}
您可以监视子树中的状态,以便在数据获取时显示进度指示器
class UsersView extends StatelessWidget {
  const UsersView({
    Key? key,
  }) : super(key: key);

  @override
  Widget build(BuildContext context) {
    final loading = context.watch(loadingRef);
    if (loading) {
      return const CircularProgressIndicator();
    }

    // Display the users in a list when have been fetched.
    final users = context.watch(usersRef);
    return ListView(...);
  }
}
或者,您可以使用 builder 参数来实现相同的目标
class Home extends StatelessWidget {
  const Home({
    Key? key,
  }) : super(key: key);

  @override
  Widget build(BuildContext context) {
    return LogicLoader(
      refs: [usersLogicRef],
      builder: (context, loading, child) {
        if (loading) {
          return const CircularProgressIndicator();
        }

        // Display the users in a list when have been fetched.
        final users = context.watch(usersRef);
        return ListView();
      },
    );
  }
}
覆盖
在某些情况下,能够覆盖 StateRef 的初始状态或 LogicRef 的工厂可能很有用
- 当我们希望一个子树在同一引用下拥有自己的状态/逻辑时。
- 用于在测试中模拟值。
在不同的作用域下重用引用。
假设我们要创建一个应用程序,其中用户可以创建计数器并查看所有计数器的总和
我们可以通过拥有一个全局状态(一个整数列表)和一个用于添加和递增计数器的业务逻辑组件来实现此目的
final countersRef = StateRef(const <int>[]);

final countersLogic = LogicRef((scope) => CountersLogic(scope));

class CountersLogic with Logic {
  const CountersLogic(this.scope);

  @override
  final Scope scope;

  void addCounter() {
    write(countersRef, read(countersRef).toList()..add(0));
  }

  void increment(int index) {
    final counters = read(countersRef).toList();
    counters[index]++;
    write(countersRef, counters);
  }
}
然后,我们可以在 widget 中使用 select 扩展方法来监视此列表的总和
final sum = context.watch(countersRef.select(
  (counters) => counters.fold<int>(0, (a, b) => a + b),
));
现在,为了创建计数器视图,我们可以在该视图的构造函数中添加一个 index 参数。
这有一些缺点
- 如果子 widget 需要访问此索引,我们将需要将
index传递给树中的每个 widget,直到我们的子 widget。 - 我们不能再使用
const关键字。
更好的方法是在每个计数器 widget 之上创建一个 BinderScope。然后,我们将配置此 BinderScope 以覆盖其后代中 StateRef 的状态,并使用不同的初始值。
任何 StateRef 或 LogicRef 都可以在 BinderScope 中被覆盖。在查找当前状态时,后代将获取在 BinderScope 中第一个被覆盖的引用的状态,直到根 BinderScope。
这可以这样写
final indexRef = StateRef(0);

class HomeView extends StatelessWidget {
  @override
  Widget build(BuildContext context) {
    final countersCount =
        context.watch(countersRef.select((counters) => counters.length));

    return Scaffold(
     ...
      child: GridView(
        ...
        children: [
          for (int i = 0; i < countersCount; i++)
            BinderScope(
              overrides: [indexRef.overrideWith(i)],
              child: const CounterView(),
            ),
        ],
      ),
     ...
    );
  }
}
BinderScope 构造函数有一个 overrides 参数,可以从 StateRef 和 LogicRef 实例上的 overrideWith 方法提供。
注意:上面代码片段的全部代码可在 example 文件中找到。
在测试中模拟值
假设您的应用程序中有一个 api 客户端
final apiClientRef = LogicRef((scope) => ApiClient());
如果您想在测试时提供一个模拟对象,您可以这样做
testWidgets('Test your view by mocking the api client', (tester) async {
  final mockApiClient = MockApiClient();

  // Build our app and trigger a frame.
  await tester.pumpWidget(
    BinderScope(
      overrides: [apiClientRef.overrideWith((scope) => mockApiClient)],
      child: const MyApp(),
    ),
  );

  expect(...);
});
每当您的应用程序中使用 apiClientRef 时,都会使用 MockApiClient 实例而不是真实实例。
高级用法
计算值
您可能会遇到这样的情况:不同的 widget 对一个由不同状态计算得出的派生状态感兴趣。在这种情况下,有一个全局定义此派生状态的方法会很有帮助,这样您就不必跨 widget 复制/粘贴此逻辑。
Binder 提供了一个 Computed 类来帮助您处理这种情况。
假设您有一个由 productsRef 引用的产品列表,每个产品都有价格,并且您可以根据价格范围(由 minPriceRef 和 maxPriceRef 引用)过滤这些产品。
然后,您可以定义以下 Computed 实例
final filteredProductsRef = Computed((watch) {
  final products = watch(productsRef);
  final minPrice = watch(minPriceRef);
  final maxPrice = watch(maxPriceRef);

  return products
      .where((p) => p.price >= minPrice && p.price <= maxPrice)
      .toList();
});
与 StateRef 一样,您可以在 widget 的构建方法中监视 Computed
@override
Widget build(BuildContext context) {
  final filteredProducts = context.watch(filteredProductsRef);
  ...
  // Do something with `filteredProducts`.
}
注意:上面代码片段的全部代码可在 example 文件中找到。
观察者
您可能希望观察状态何时发生更改并据此执行某些操作(例如,记录状态更改)。
为此,您需要实现 StateObserver 接口(或使用 DelegatingStateObserver),并将实例提供给 BinderScope 构造函数的 observers 参数。
bool onStateUpdated<T>(StateRef<T> ref, T oldState, T newState, Object action) {
  logs.add(
    '[${ref.key.name}#$action] changed from $oldState to $newState',
  );

  // Indicates whether this observer handled the changes.
  // If true, then other observers are not called.
  return true;
}
...
BinderScope(
  observers: [DelegatingStateObserver(onStateUpdated)],
  child: const SubTree(),
);
撤销/重做
Binder 提供了一种内置方法来在状态更改的时间线上移动。
为了能够撤销/重做状态更改,您必须在树中添加一个 MementoScope。MementoScope 将能够观察其下方发生的所有更改
return MementoScope(
  child: Builder(builder: (context) {
    return MaterialApp(
      home: const MyHomePage(),
    );
  }),
);
然后,在 MementoScope 下存储的业务逻辑中,您将能够调用 undo/redo 方法。
注意:如果您没有在调用 undo/redo 的业务逻辑上方提供 MementoScope,您将在运行时收到一个 AssertionError。
可 Dispose
在某些情况下,您会在托管业务逻辑组件的 BinderScope 被 dispose 之前执行某些操作。为了有机会这样做,您的逻辑需要实现 Disposable 接口。
class MyLogic with Logic implements Disposable {
  void dispose(){
    // Do some stuff before this logic go away.
  }
}
StateListener
如果您想在状态更改时导航到另一个屏幕或显示对话框,可以使用 StateListener widget。
例如,在身份验证视图中,当身份验证失败时,您可能希望显示一个提醒对话框。
为此,在逻辑组件中,您可以设置一个状态来指示身份验证是否成功,并在视图中有一个 StateListener 来响应这些状态更改
return StateListener(
  watchable: authenticationResultRef,
  onStateChanged: (context, AuthenticationResult state) {
    if (state is AuthenticationFailure) {
      showDialog<void>(
        context: context,
        builder: (context) {
          return AlertDialog(
            title: const Text('Error'),
            content: const Text('Authentication failed'),
            actions: [
              TextButton(
                onPressed: () => Navigator.of(context).pop(),
                child: const Text('Ok'),
              ),
            ],
          );
        },
      );
    } else {
      Navigator.of(context).pushReplacementNamed(route_names.home);
    }
  },
  child: child,
);
在上面的代码片段中,每次由 authenticationResultRef 引用的状态更改时,都会触发 onStateChanged 回调。在此回调中,我们只需验证状态的类型即可确定是显示提醒对话框还是不显示。
Dart Dev Tools
Binder 旨在简化您的应用程序的调试。通过使用 Dart Dev tools,您将能够检查由任何 BinderScope 托管的当前状态。
代码片段
您可以在 vscode 上找到代码片段:snippets。
赞助
我利用业余时间开发我的软件包,但我没有足够的时间。如果此软件包或我创建的任何其他软件包对您有帮助,请考虑赞助我,以便我能有时间阅读 issues、修复 bug、合并 pull requests 并为这些软件包添加功能。
贡献
欢迎您为本项目做出贡献。
如果您发现 bug 或想要一项功能,但不知道如何修复/实现,请提交一个 issue。
如果您修复了一个 bug 或实现了一项功能,请发送一个 pull request。


